Skip to content
Close
Site guide For the RPA team

How to edit this site

A plain guide to changing the words, pictures, numbers and links on risetprimaasia.com. No technical knowledge needed: if you have used Word, you can do everything here.

01 Start here

Two places, and you can change everything

Every word, picture, number and link on this site can be changed by you, without touching code. Nothing you do here is permanent: every save keeps the version before it.

Step 1

Log in

Add /wp-admin to the end of the site’s address — for example risetprimaasia.com/wp-admin — and use the login you were given. You arrive at the WordPress Dashboard, with a dark menu down the left side. Everything in this guide starts from that menu.

Once you are logged in, a dark bar also appears across the top of the public site. On any page, its Edit with Elementor link takes you straight to editing that page.
Step 2

Know the two places you will edit

Pages → Edit with Elementor is for everything in the middle of a page: headlines, paragraphs, pictures, figures, the map, the services. Elementor is the page editor; you click a block on the page and change it in a panel beside it.

Appearance → Customize is for what repeats on every page: the button in the header, everything in the dark footer, and the standard wording around articles.

Articles (“insights”) are the third thing you will touch. They are ordinary WordPress posts, written under Posts — see Publish a new insight.

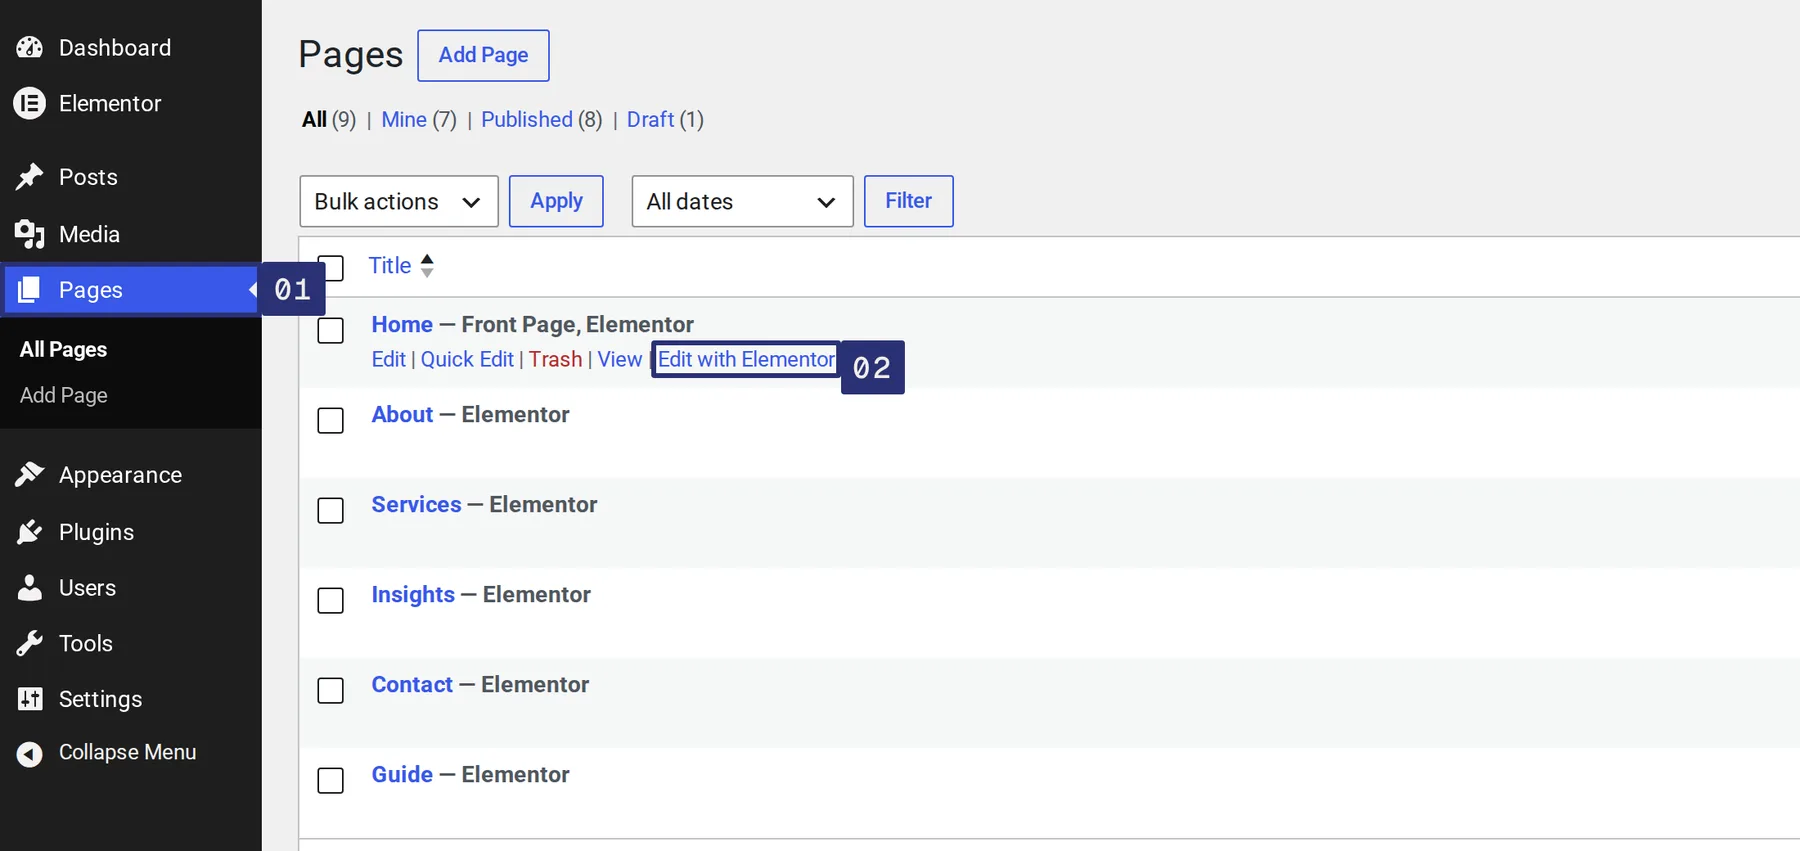
  1. Choose Pages in the left menu.
  2. Move your mouse over a page’s name and choose Edit with Elementor. (Plain “Edit” opens an empty WordPress screen with a blue “Edit with Elementor” button — that works too.)
The Pages list in the WordPress admin. The Pages item in the left menu is marked 01; the “Edit with Elementor” link under the Home page is marked 02.
Pages → move the mouse over a page → Edit with Elementor.

Step 3

A one-minute tour of the editor

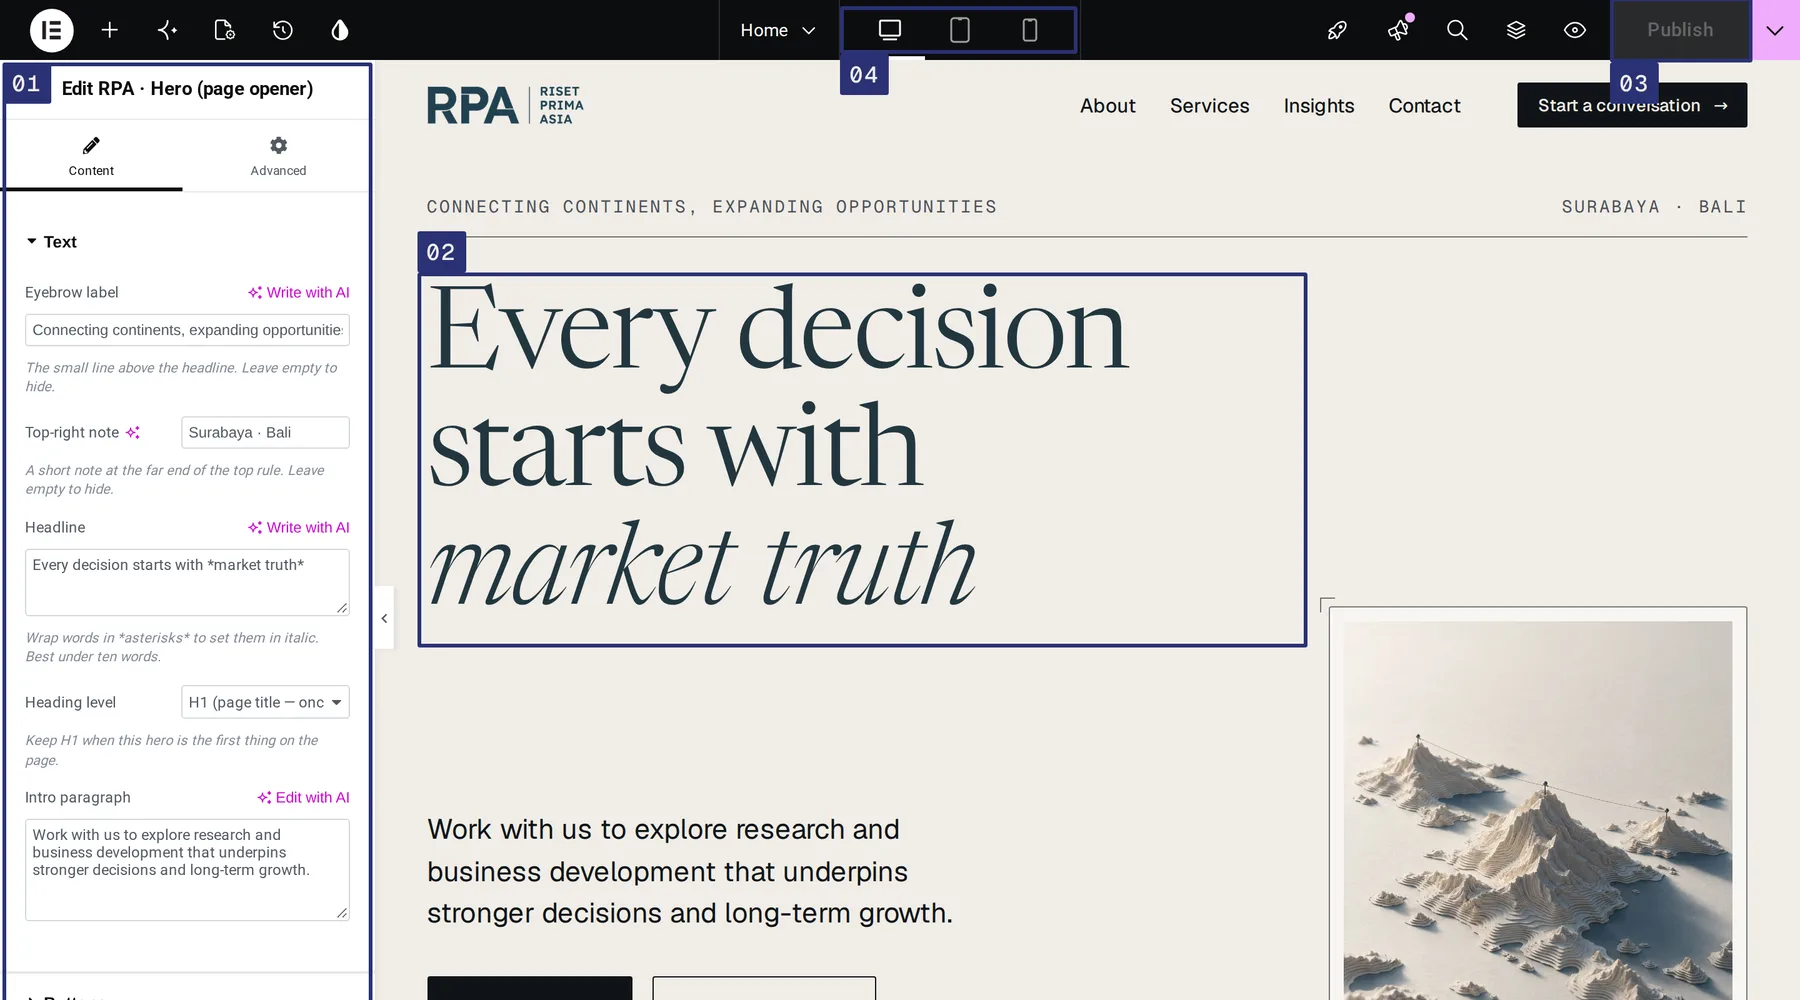
  1. The panel. When you click something on the page, its fields appear here. This is where you type.
  2. The page. A live preview. Click any block to select it; what you type in the panel shows here straight away.
  3. Publish. Nothing reaches visitors until you press this. It stays grey until you have changed something. On a page that is already public, “Publish” simply means “save my changes”.
  4. Desktop, tablet, phone. Check how your change looks on a phone before you publish — most visitors will see it there.

Made a slip? Ctrl + Z (⌘ + Z on a Mac) undoes it, as in Word.

The Elementor editor with the Home page open. Marked: 01 the editing panel on the left, 02 the headline on the page preview, 03 the Publish button at the top right, 04 the desktop, tablet and phone preview switch.
The Elementor editor with the Home page open.
02 Words

Edit text on a page

Click it, type, publish. That really is all.

Step 1

Click the block, then type in the panel

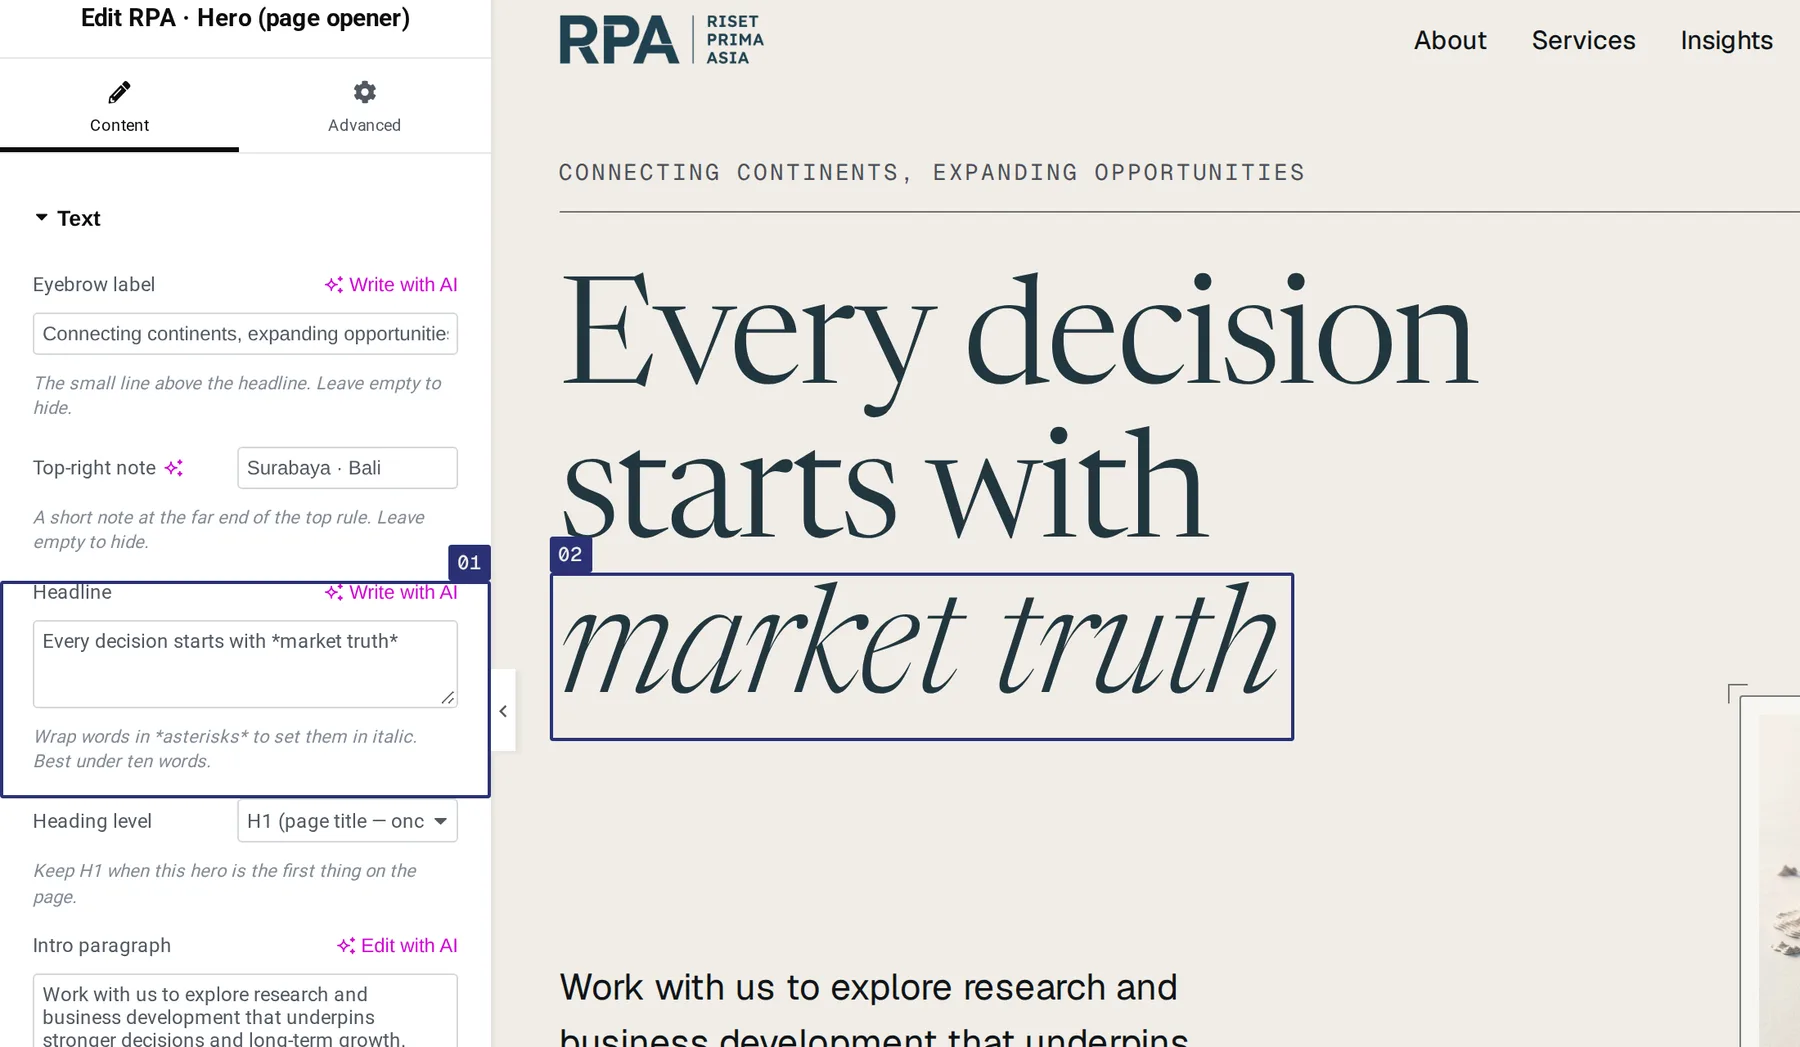
Open the page with Edit with Elementor and click the text you want to change. The panel on the left now shows that block’s name — “Edit RPA · Hero (page opener)”, for example — and one field for each piece of text in it.

  1. Type in the field. Each field has a plain label (Eyebrow label, Headline, Intro paragraph) and often a line of advice in grey italics underneath.
  2. The page updates as you type, so you can see at once whether a headline has become too long.

Fields are grouped under headings such as Text, Buttons and Layout. Click a heading to open it. To hide something — a button, a small label — leave its field empty.

When you are happy, press Publish at the top right.

The Hero block’s panel. The Headline field, marked 01, reads “Every decision starts with *market truth*”; on the page, marked 02, the words “market truth” are in italic.
The Headline field, and the same headline on the page.

Step 2

Asterisks make italics

Headings on this site use one typographic flourish: a word or two set in italic. You make it by wrapping the words in asterisks.

Typing Every decision starts with *market truth* gives “Every decision starts with market truth”.

It works in every heading field, and in the footer sign-off line. Use it for one or two words per heading — the ones that carry the meaning. If everything is emphasised, nothing is.

Step 3

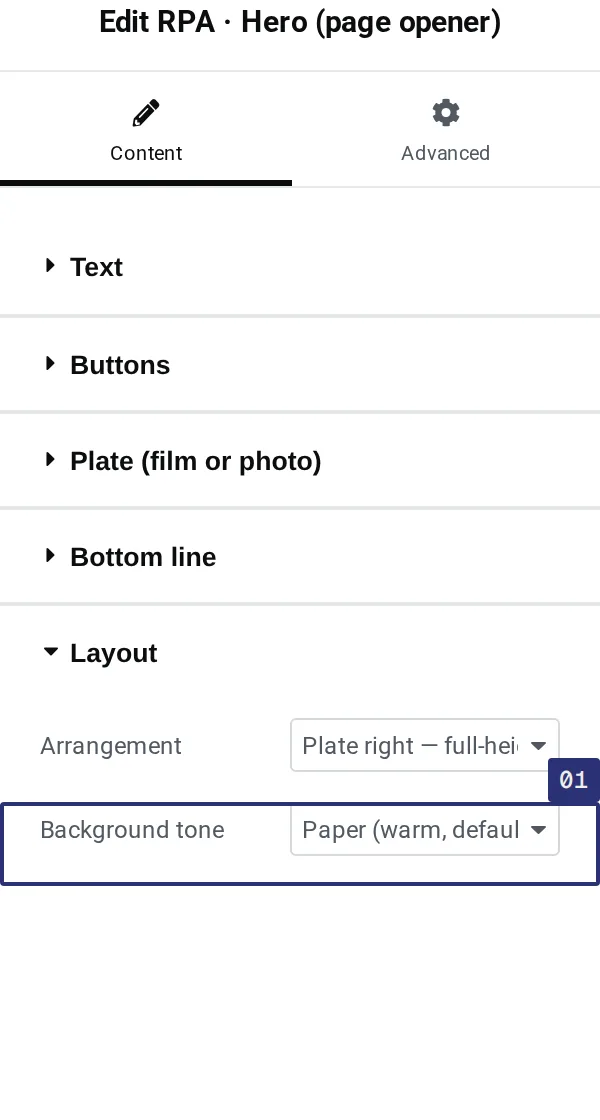
Background tone

Most blocks have a Background tone menu under Layout. It tells the block what colour it sits on, so the text, rules and links adjust to stay readable.

  • Paper (warm, default) and Bone (lighter) — dark text on a light ground.
  • Ink (dark) and Petrol (brand dark) — light text on a dark ground.

Full-width bands (the hero, statement, figures, moving words, closing call to action) paint their own background, so changing the tone changes the band. Other blocks only adapt their text: the background behind them belongs to the section that holds them.

The Layout section of a block’s panel with the “Background tone” menu marked 01, set to “Paper (warm, default)”.
Layout → Background tone.

Step 4

Longer text with links

A few fields — Text in the Image + text block, and the plain Text Editor block — are small word processors with buttons for bold, lists and links. To make a link, select the words, press the chain icon and paste the address.

When you paste from Word or an email, use Ctrl + Shift + V (paste as plain text). Ordinary paste brings Word’s fonts and colours with it, and they will fight the site’s design.

03 Pictures

Change a picture

Pictures are chosen from the Media Library — the site’s own photo drawer. You can pick one that is already there or upload a new one.

Step 1

Click the picture in the panel

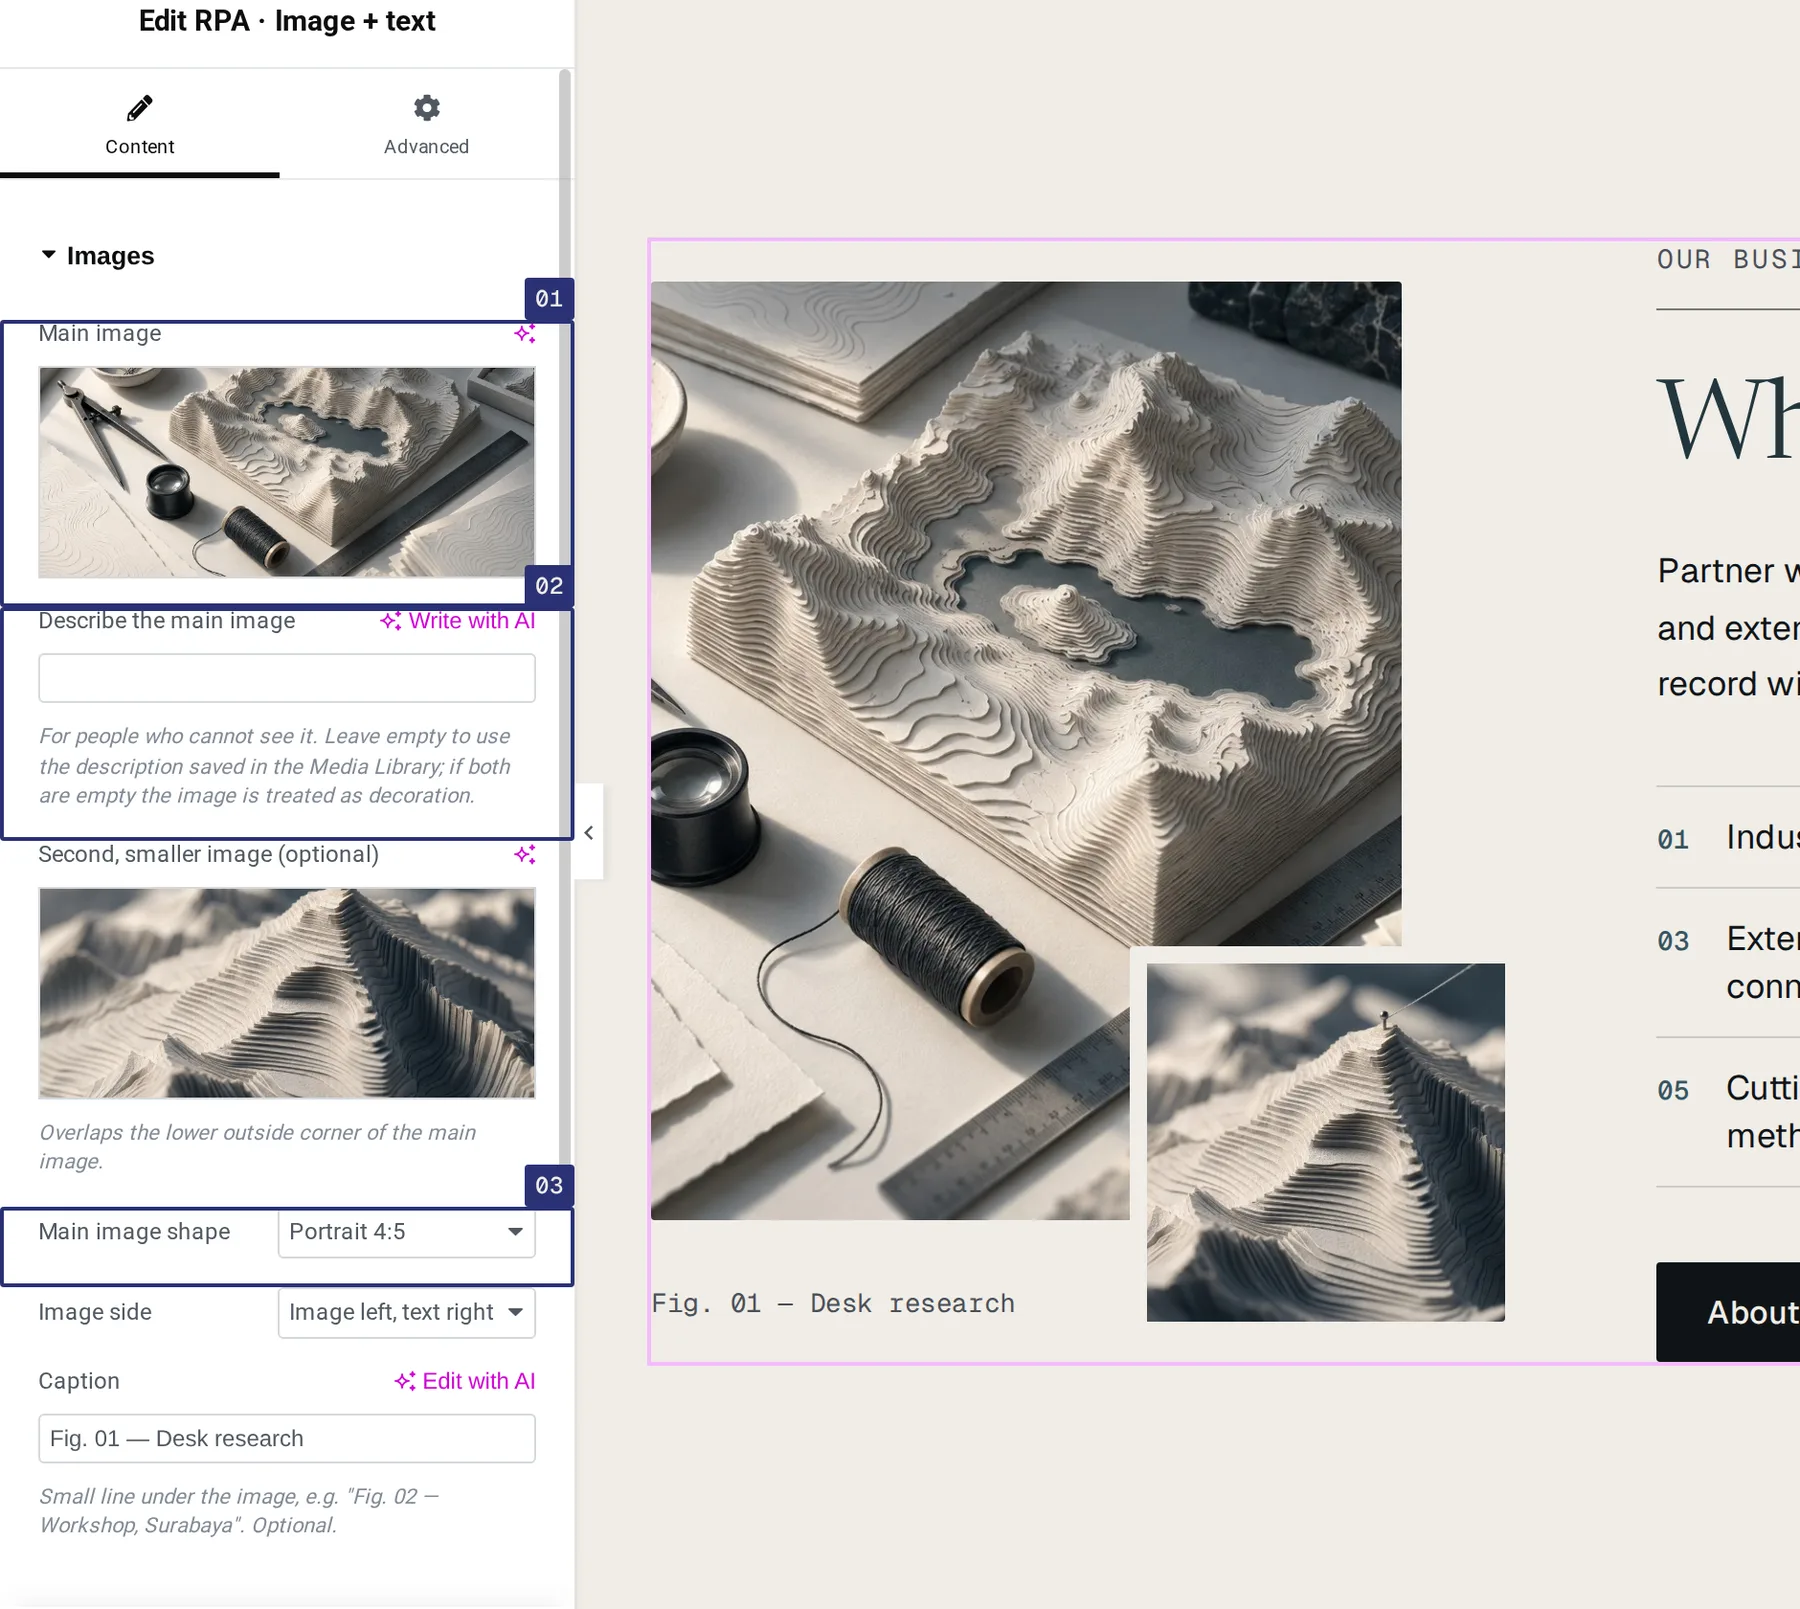
Select the block, open its Images section (in the hero it is called Plate (film or photo)) and click the small preview of the current picture.

  1. The picture. Click it to choose another. The bin icon that appears when you hover removes it.
  2. The description — see step 3. It matters.
  3. Shape. Where a block offers a shape, the picture is cropped to it automatically. You never need to crop by hand.
The Images section of the Image + text block. Marked: 01 the Main image picker, 02 the “Describe the main image” field, 03 the “Main image shape” menu.
The Images section of the Image + text block.

Step 2

Choose or upload

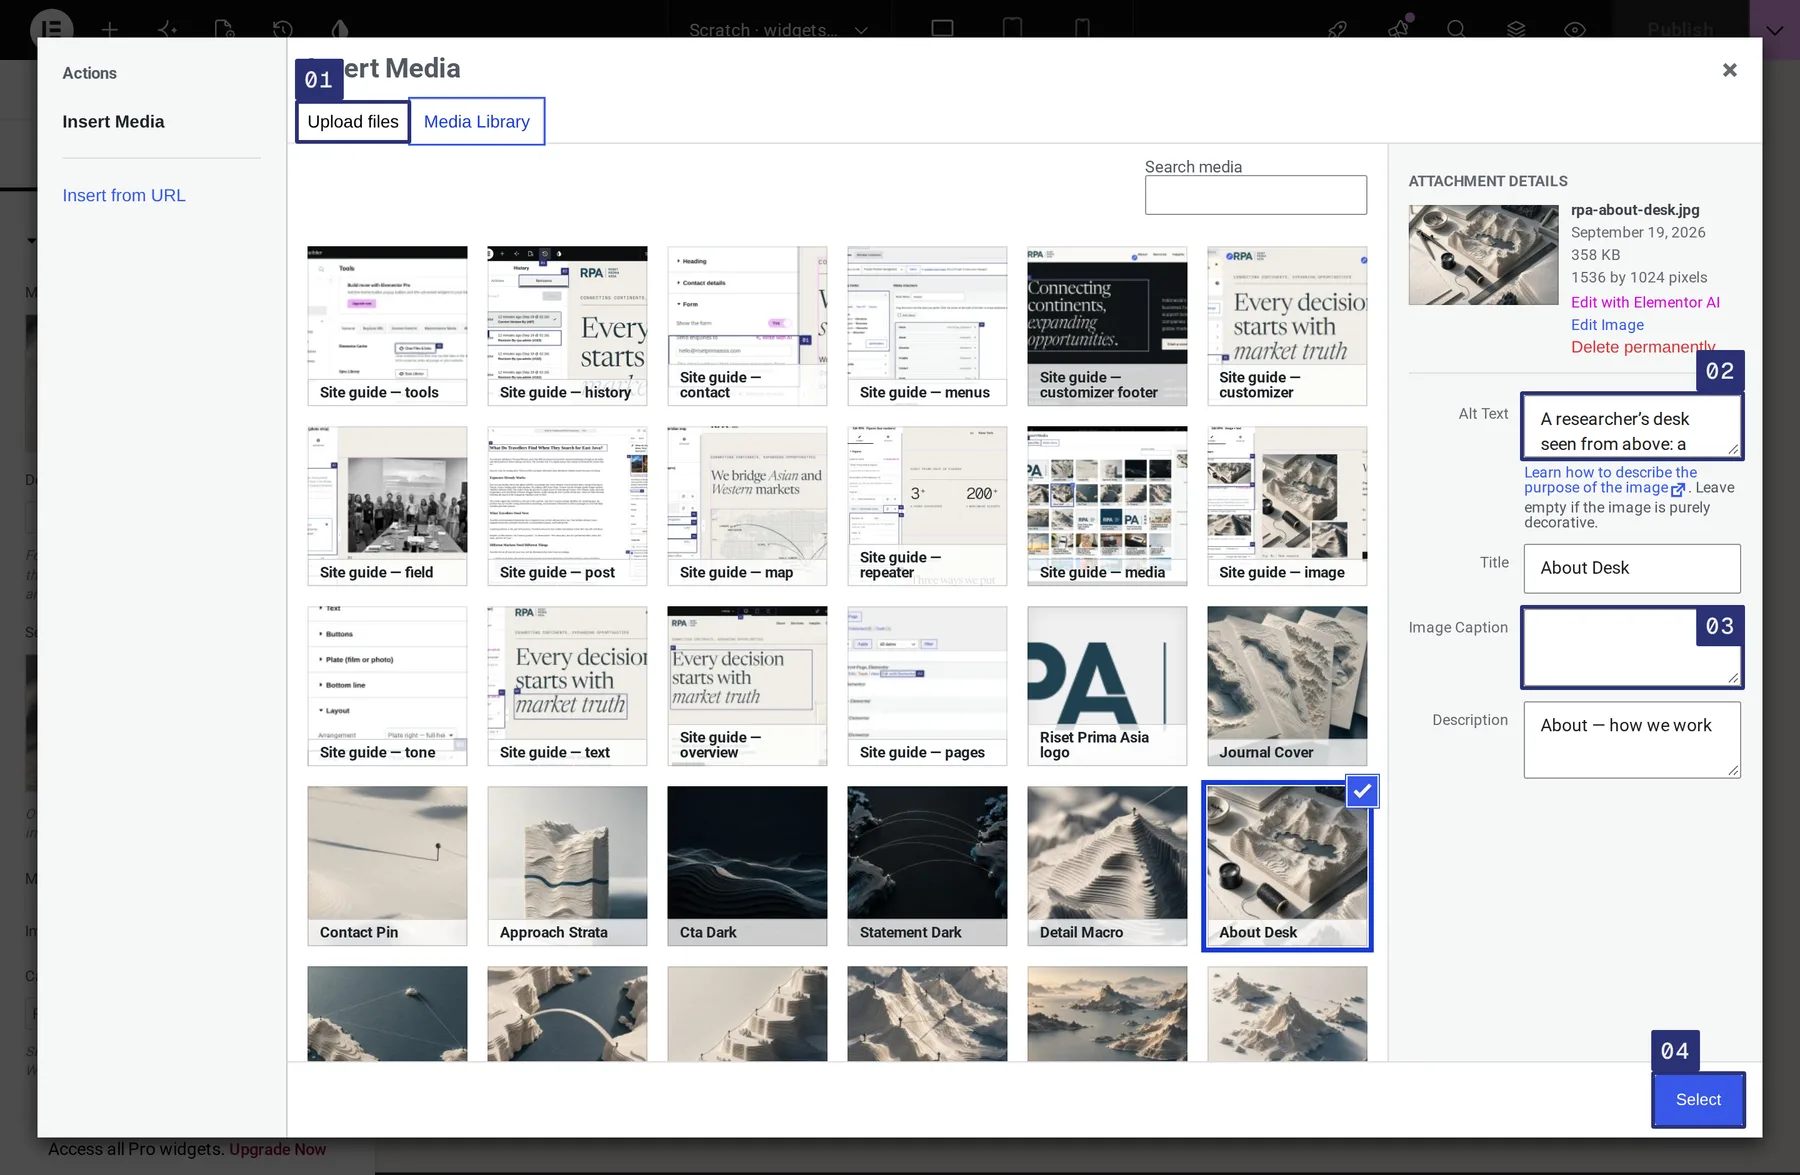
  1. Upload files — drag a photo from your computer into the window, or stay on Media Library and click one that is already there.
  2. Alt Text — describe the picture in a sentence.
  3. Image Caption — only used by the field photo strip; see Field photos.
  4. Press Select. Then Publish the page.
The Insert Media window with a picture selected. Marked: 01 the Upload files tab, 02 the Alt Text field, 03 the Image Caption field, 04 the Select button.
The Insert Media window.

Step 3

Always describe the picture

The Alt Text is read aloud to visitors who cannot see the picture, and it is what Google reads too. Say what is in the frame, in one plain sentence: “Workshop participants around a table in Surabaya”, not “image1” and not a slogan.

Some blocks also have their own description field (Describe the main image, Image description). Leave it empty to use the Media Library’s Alt Text; fill it in when the same picture needs different words on this page.

Sizes that work best
Where Shape and size Good to know
Hero plate 2:3 portrait · at least 1024 × 1536 px A landscape photo will be cropped hard. Use “Keep in view” to choose which part survives.
Service plates (Plates rail) 4:5 portrait · at least 1200 × 1500 px
Image + text 4:5, 1:1 or 16:9 — you choose · at least 1600 px on the long side Pick the shape with “Main image shape”.
Wide bands and background images 3:2 landscape · about 2400 × 1600 px Statement and Closing call to action. Dark, quiet pictures keep the text readable; if it is not, raise “Dimming strength”.
Featured image of an insight 3:2 or 16:9 landscape · at least 1600 px wide Shown whole at the top of the article and cropped to 3:2 in lists.

Step 4

Keep files light, and mind the colour

Under about 500 KB per picture. A photo straight from a phone is often ten times that, and slows the page for everyone on mobile data. Before uploading, export it as JPEG at around 2400 px wide — any photo app can do this, or a free site such as squoosh.app.

Monochrome. The site’s look is black-and-white photography with a slight blue-grey tint. The hero has a Monochrome treatment switch: turn it on for an ordinary colour photo. Field photos and the large picture at the top of an article are shown in black and white automatically, and return to colour when a visitor points at them. Pictures inside an article’s text stay in colour.

04 Repeating items

Numbers, lists and repeating items

Figures, claims, steps, checklists, contact lines, cities on the map, the moving words: all of them are lists of rows, and all rows work the same way.

Step 1

How rows work

Click a row’s name to open it; click again to close it.

  1. The row’s fields. Change them like any other text.
  2. Duplicate (the two-sheets icon) copies the row — the quickest way to add one that looks like its neighbours. × deletes it.
  3. Drag to reorder. Press on a closed row’s name and drag it up or down.
  4. Add Item adds a fresh row at the bottom.
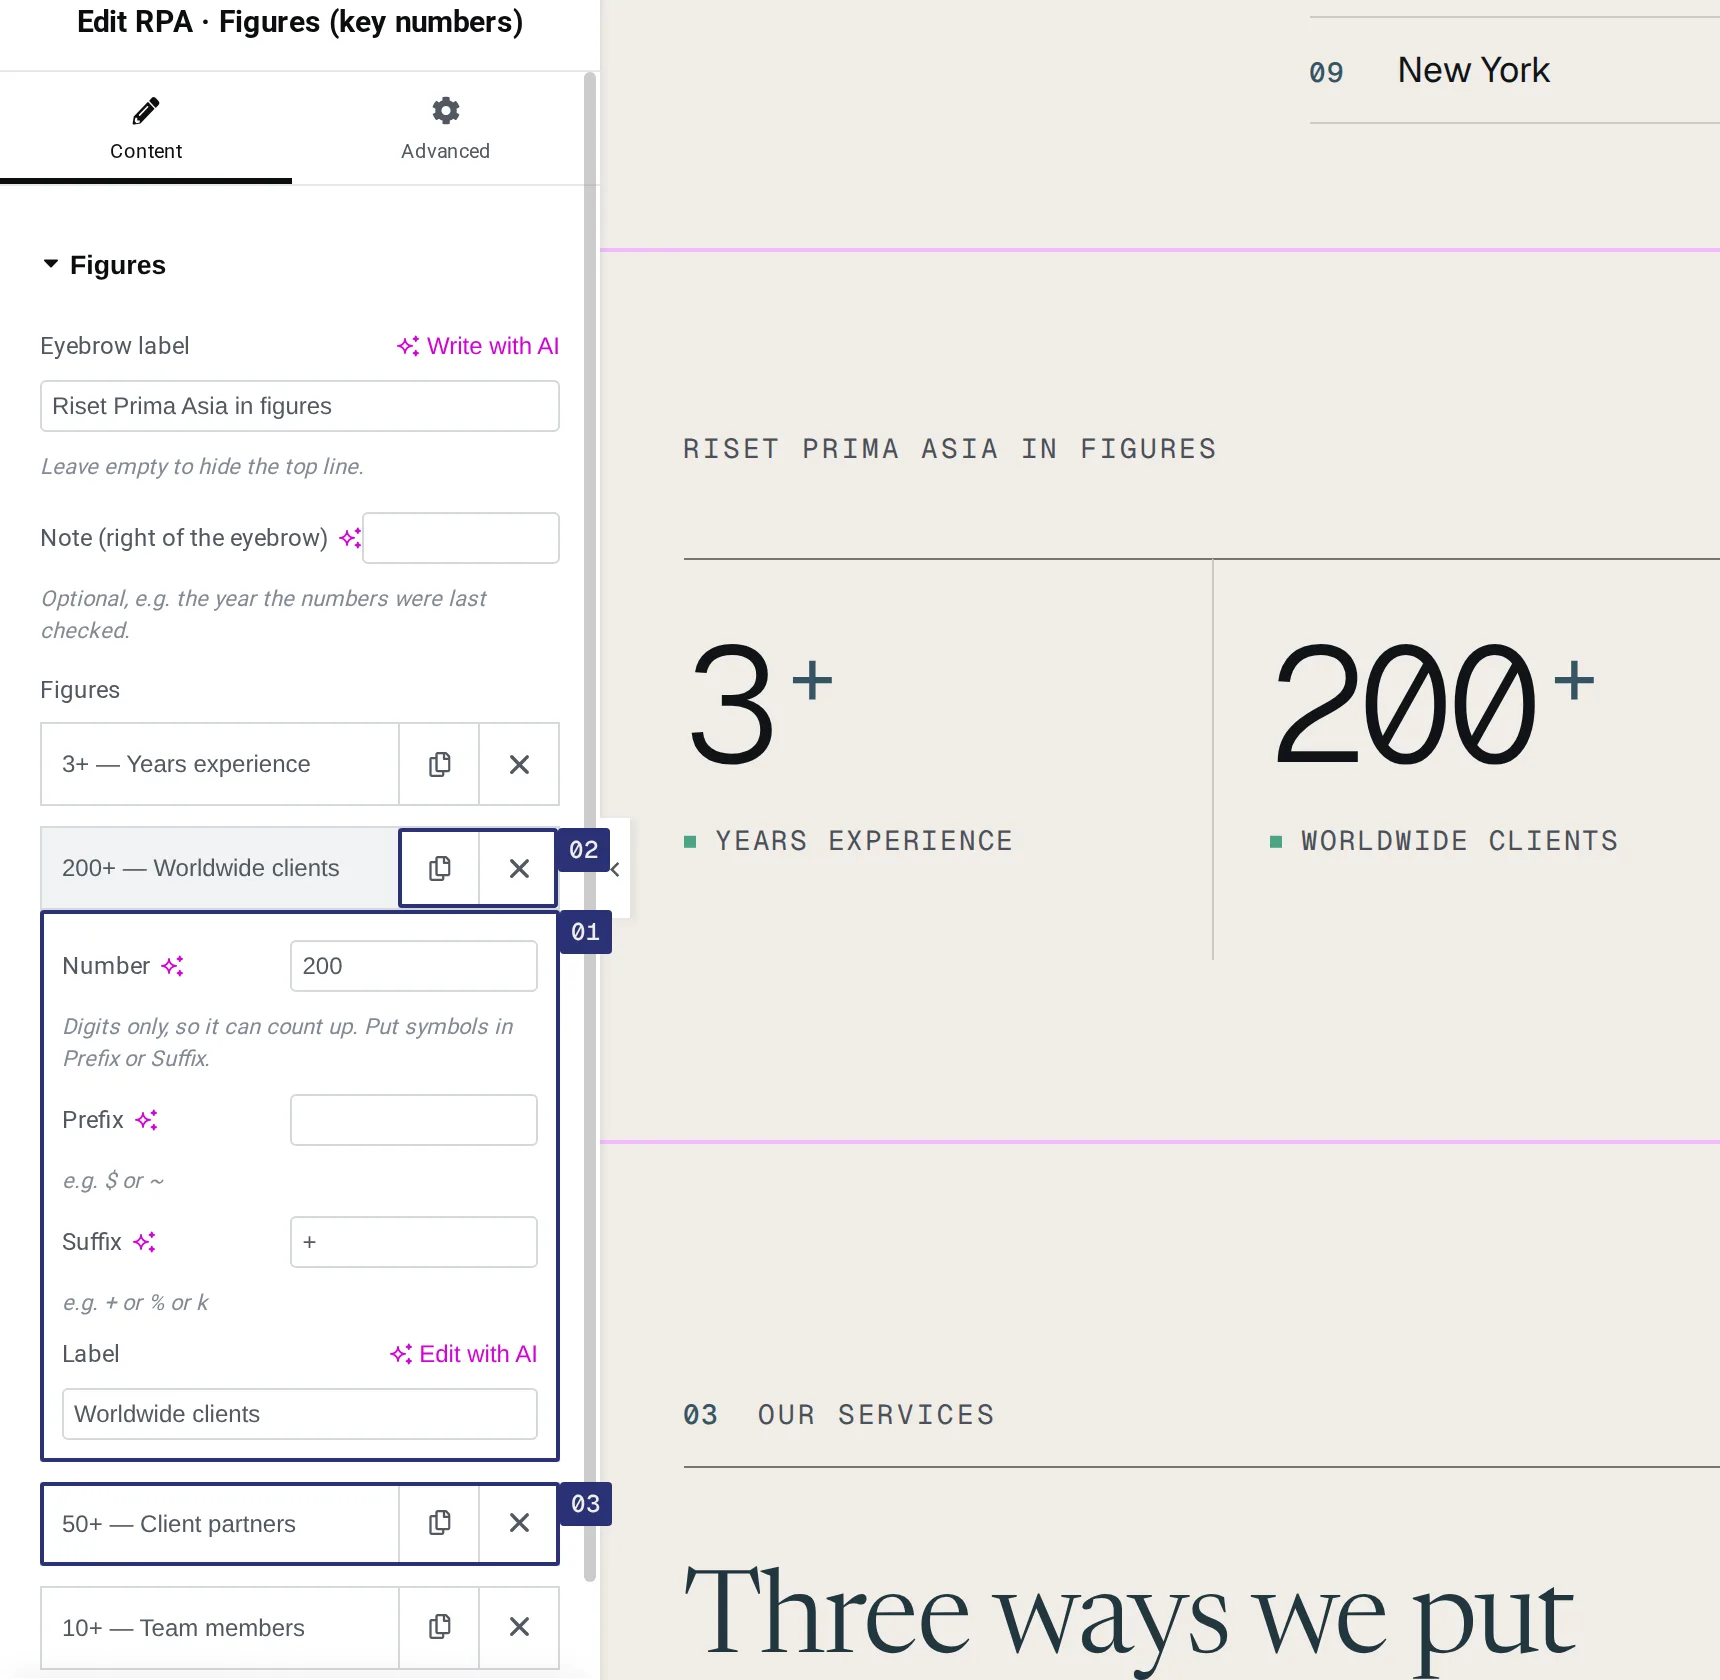
The Figures block’s panel with the second row open. Marked: 01 the row’s fields (Number, Prefix, Suffix, Label), 02 the duplicate and delete icons, 03 a closed row that can be dragged, 04 the Add Item button.
The Figures block: four rows, the second one open.
Blocks built from rows
Block Each row holds Good to know
Figures (key numbers) Number · Prefix · Suffix · Label Digits only in Number, so it can count up on screen. Put “+”, “%” or “$” in Prefix or Suffix. Only publish numbers you can stand behind.
Claims (ruled columns) Number · Title · Text · optional link Two to four rows sit best.
Steps (numbered list) Title · Text Numbered 01, 02, 03 automatically, in the order of the rows.
Image + text → Checklist Text Short phrases. An even number of rows fills two columns neatly.
Closing call to action → Contact lines Label · Value · Link For a phone link write tel:+62812… ; for email, mailto:hello@risetprimaasia.com.
Contact block → Lines, Social links Label · Value · Link
Marquee (moving words) One word or short phrase Six to ten words read best. It stands still for visitors who have asked their device for less motion.
Plates rail (services) Number · Title · Text · Image · Link label · Link
Meridian map → Cities City · Latitude · Longitude · Line starts from See the next step.

Step 2

Add a city to the map

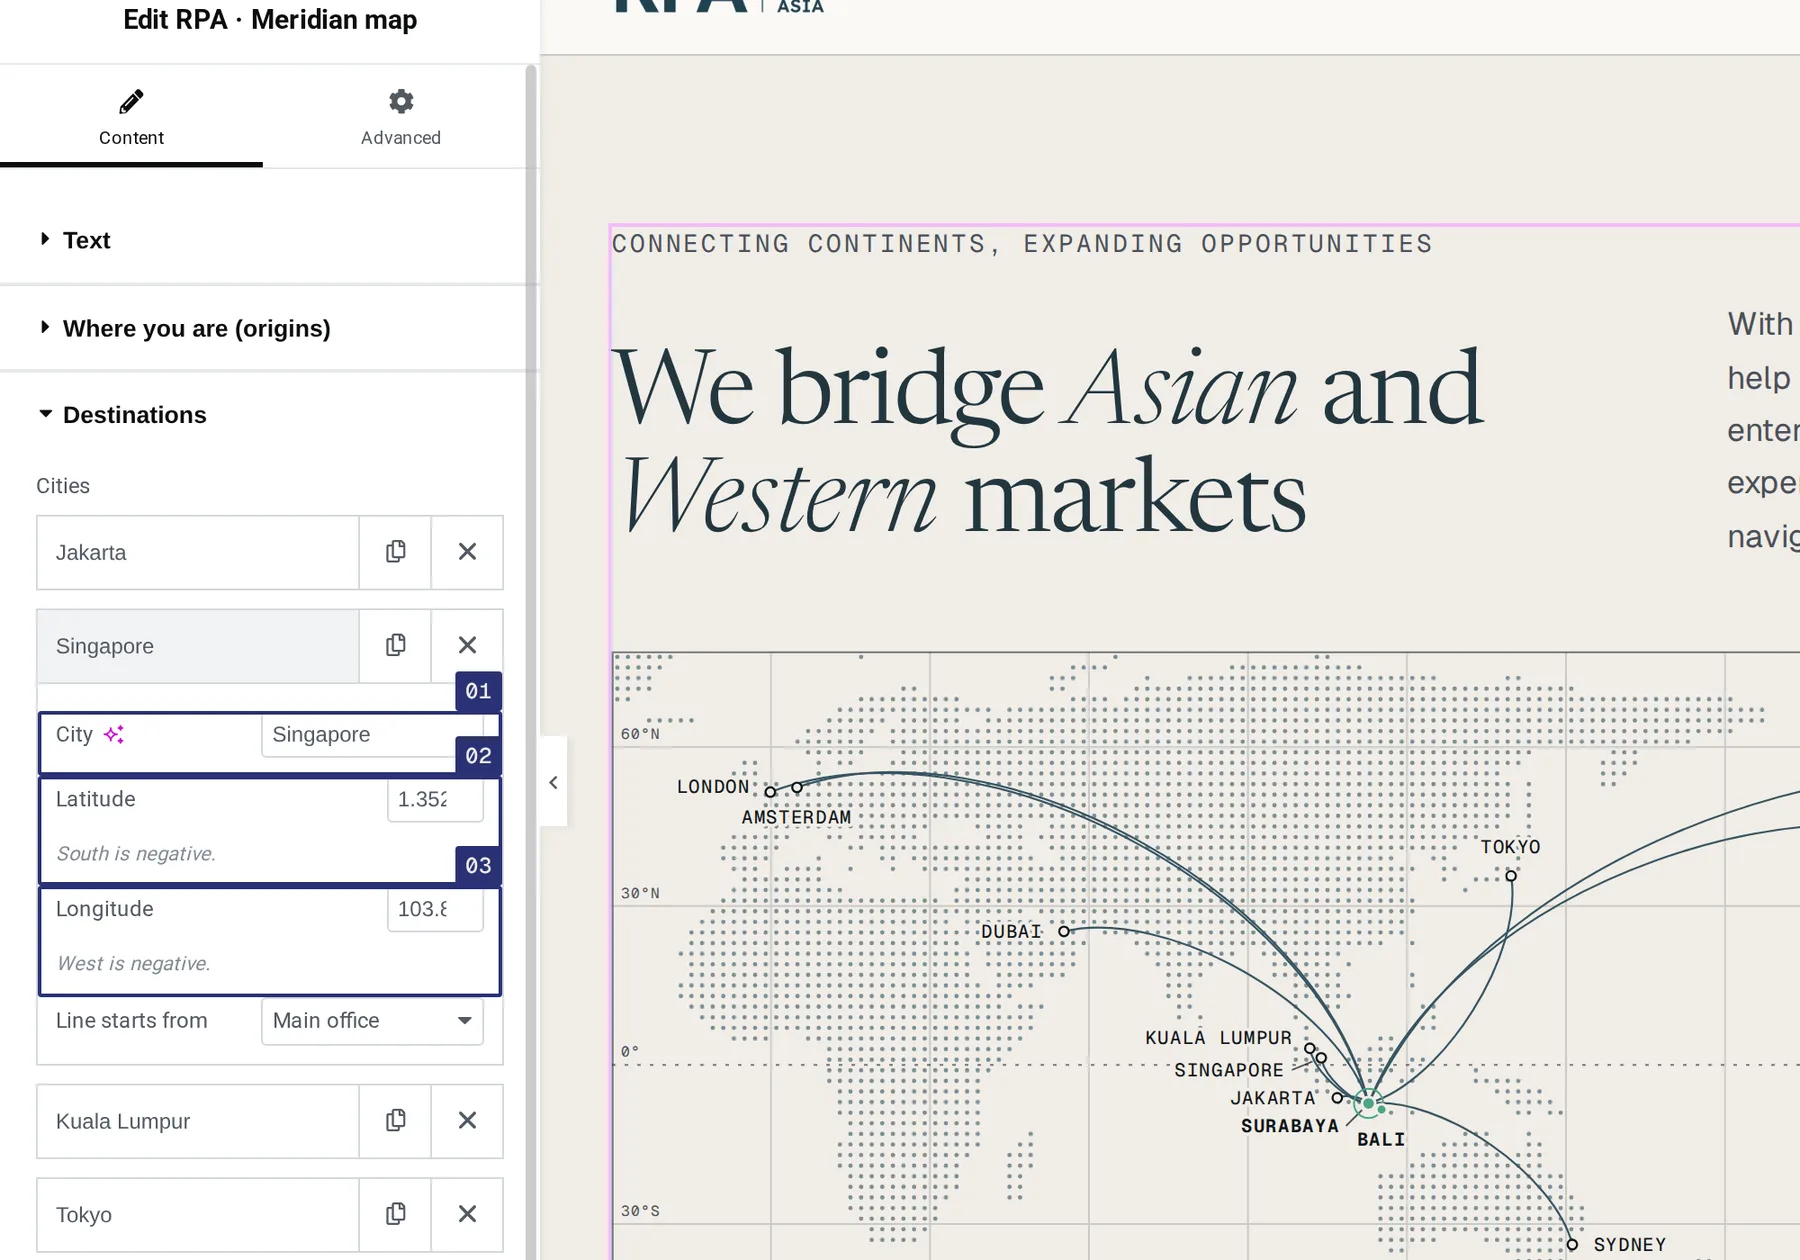
Select the map, open Destinations and press Add Item (or duplicate a city).

  1. City — the name as it should appear.
  2. Latitude — north is positive, south is negative. Surabaya is −7.2575.
  3. Longitude — east is positive, west is negative. New York is −74.006.

Where to find the numbers: open Google Maps, right-click the city and click the pair of numbers at the top of the little menu — that copies them, latitude first. Wikipedia also shows them at the top right of every city’s page. Two or three decimal places are plenty.

Line starts from chooses whether the line is drawn from the main office or the second office. The map draws the line and places the label by itself.

The Meridian map block’s Destinations section with the Singapore row open. Marked: 01 City, 02 Latitude, 03 Longitude.
Destinations → Singapore: 1.3521, 103.8198.
05 Insights

Publish a new insight

Insights are the research articles. They are written in WordPress’s own editor — not Elementor — so every article gets the same careful reading layout without any design work from you.

Step 1

Posts → Add Post

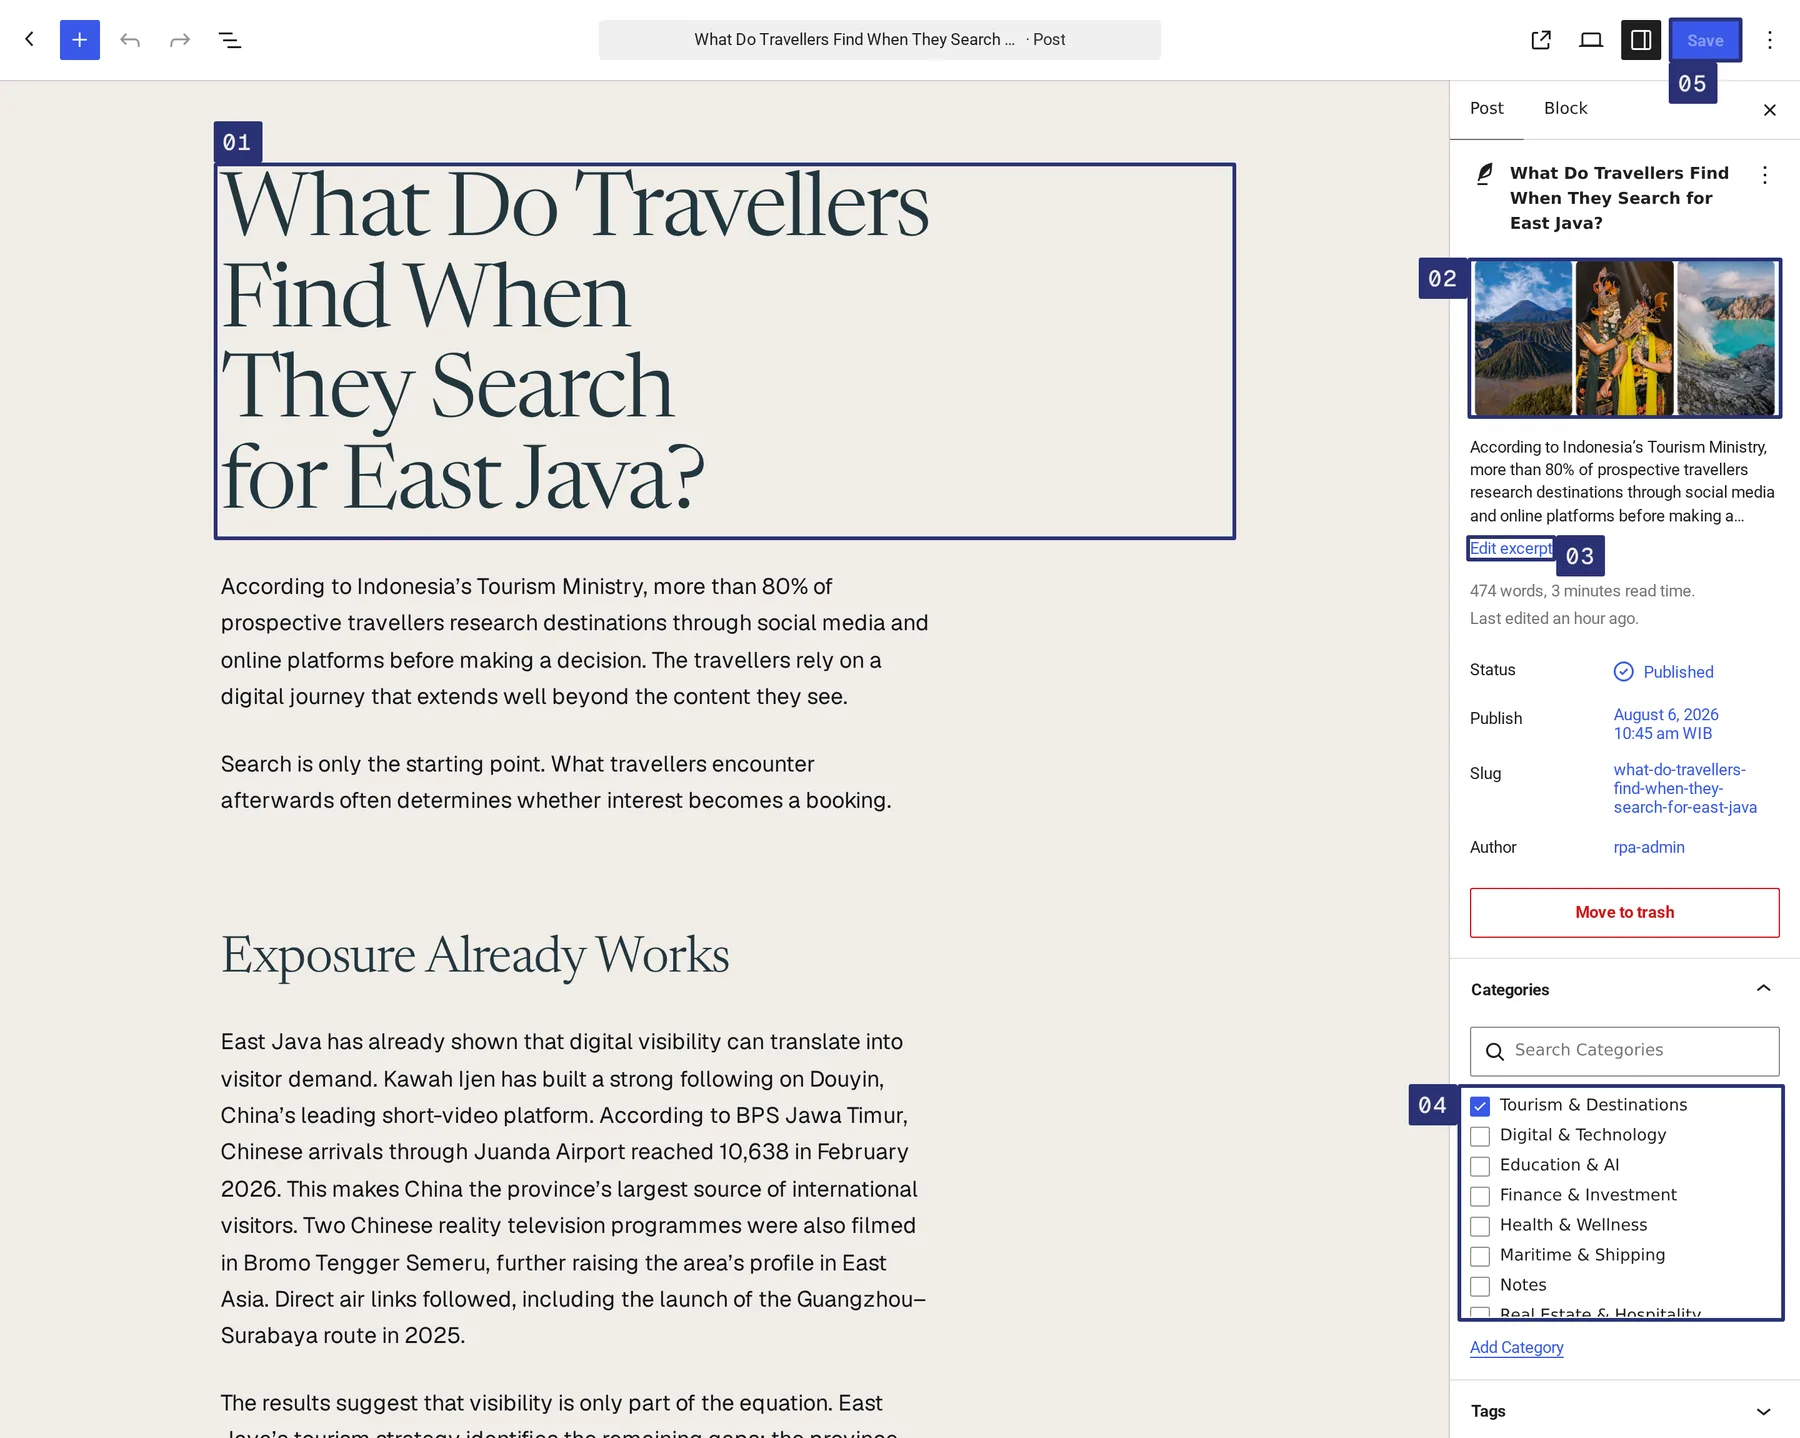
  1. Title. Article titles follow RPA’s existing Title Case — “Domestic Travellers Are Fueling East Java’s Tourism Growth” — with short joining words (as, of, and, for, in, the) in lower case. No full stop. The title becomes the page’s address too.
  2. Featured image. Press Set featured image in the right-hand column (if the column is hidden, press the square sidebar icon at the top right). It appears at the top of the article and in every list. Give it Alt Text.
  3. Excerpt. One or two complete sentences that say what the reader will learn. The site uses it as the summary in lists and in search results; without one, WordPress cuts the first paragraph off mid-thought.
  4. Categories are the site’s Topics. Tick exactly one. (“Notes” is only the fallback for posts with no topic; do not pick it.)
  5. Publish — it reads Save once an article is already public.

Write, or paste, the text under the title. Press Enter for a new paragraph. For a section heading, type /heading and press Enter — and keep it at Heading 2 (H2). The article’s title is already Heading 1, and there should be only one. Use Heading 3 inside a section if you need it.

Heading 2 does one more job. On a wide screen, an article with three or more of them shows an In this article list in the margin beside the text, and each entry jumps to its section. The list builds itself from your Heading 2s — nothing to set up — so give sections short, plain headings, and do not make a heading by setting a paragraph in bold: it will look similar and be missing from the list.

An insight open in the WordPress post editor. Marked: 01 the title, 02 the featured image, 03 the “Edit excerpt” link, 04 the Categories list with one topic ticked, 05 the Save button.
An insight in the WordPress editor.

Step 2

What happens next

Nothing more to do. A published insight appears by itself at the top of the Insights page, in the latest-insights list on Home, in its topic’s page, and under “Continue reading” on related articles. Its date, topic and reading time are worked out for you.

To publish later, click Immediately next to “Publish” in the right-hand column and choose a date. To take an article down, change its Status to Draft.

Step 3

Add a new topic

In the Categories box of any article, press Add Category, type the name and confirm. Or go to Posts → Categories, where you can also rename a topic or write a description for it.

A topic appears on the site as soon as one published article uses it. Keep the list short: eight topics that each hold several articles serve readers better than twenty that hold one.

The row of topic buttons under the title of the Insights page, and on every topic and search page, builds itself from this list, with the number of articles beside each name. There is nothing to add by hand. (On the Insights page that row is a small block that contains only [rpa_topics] — leave it as it is.)

06 From the field

Field photos

The strip of photographs from workshops and fieldwork.

Step 1

How the strip chooses its photos

Select the strip on the page and open Photos.

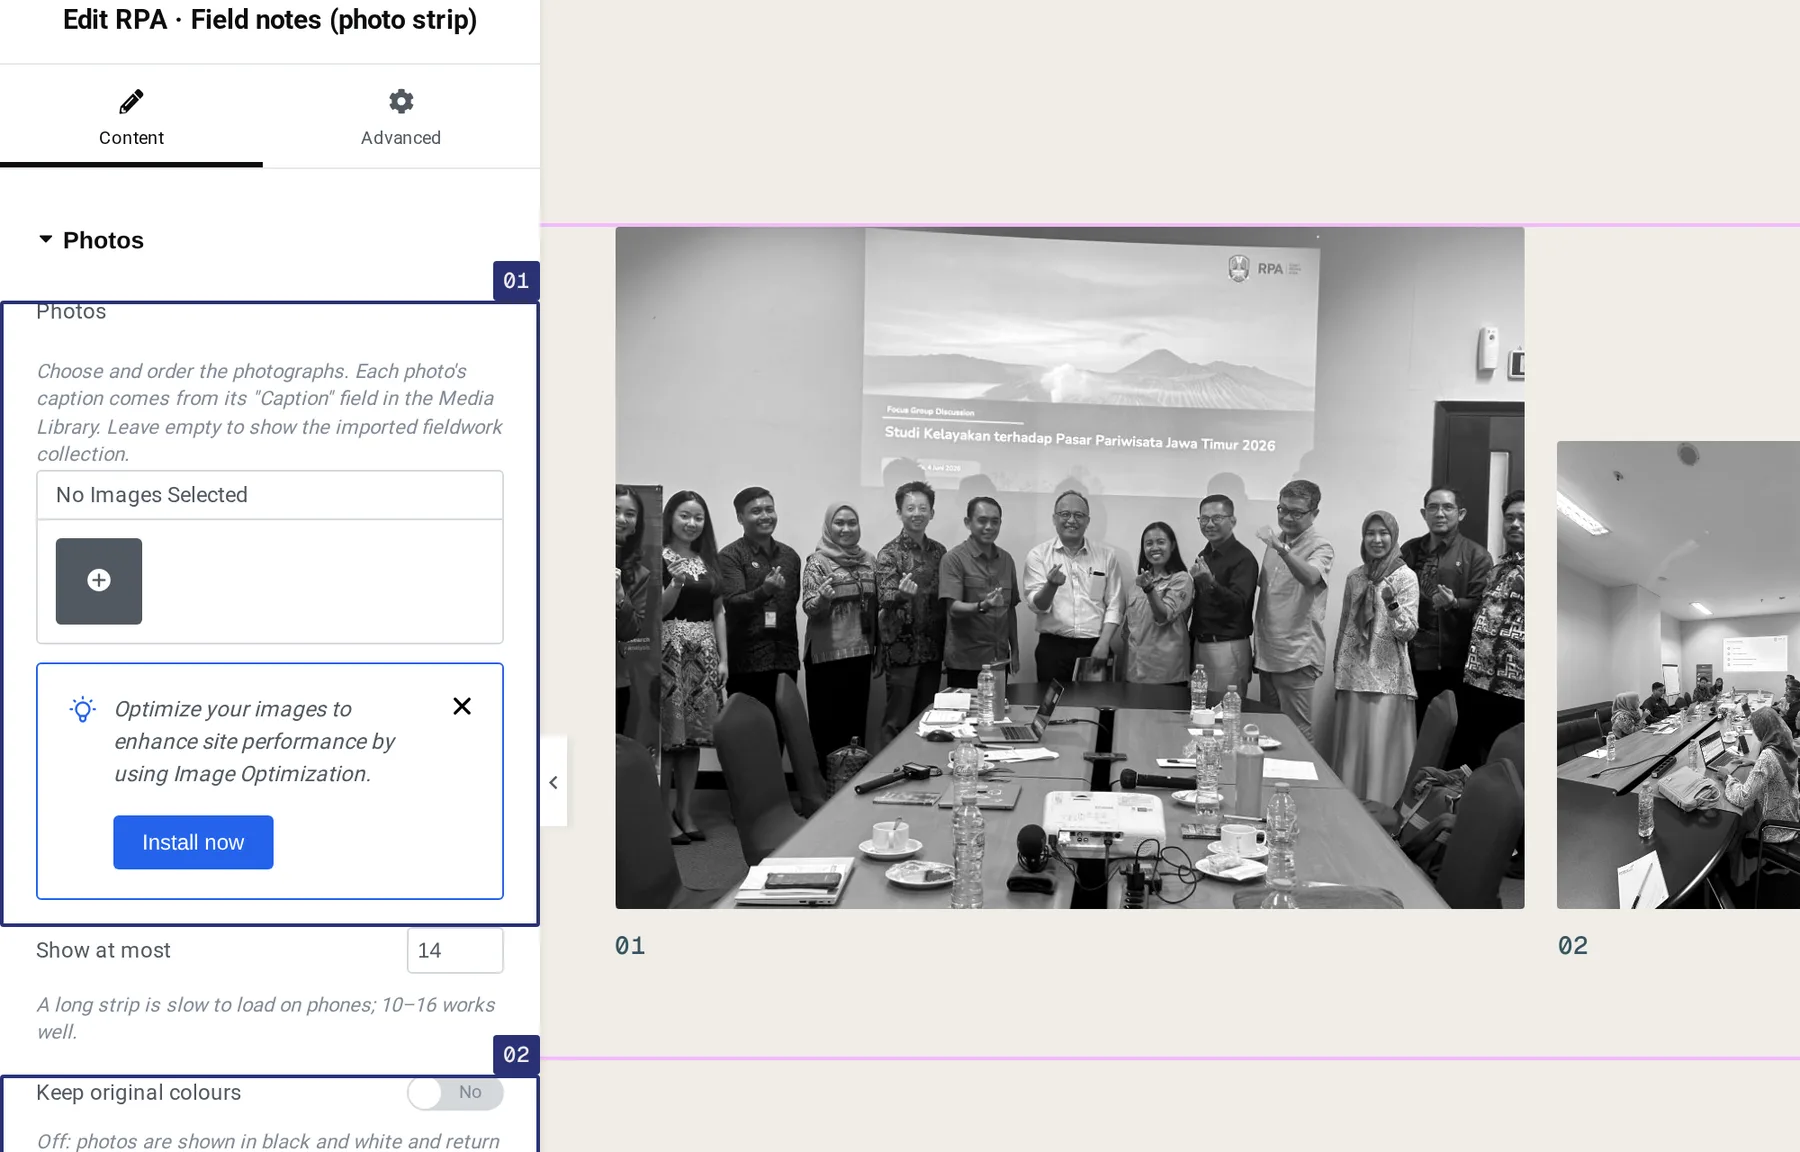
  1. Photos. Click to choose exactly which photographs appear, and drag them into order inside the gallery window. If you leave it empty, the strip shows the fieldwork photographs that were brought over from the old site.
  2. Keep original colours. Off by default: photos are shown in black and white and return to colour when a visitor points at them.

Show at most limits the number (10–16 works well; a long strip is slow on phones). To add a new photo: click Photos, upload it, make sure it is ticked, and press Insert gallery.

The Field notes block’s panel. Marked: 01 the Photos gallery picker, 02 the “Keep original colours” switch.
The Field notes block.

Step 2

Write captions

The small line under each photo comes from the photo’s own Caption in the Media Library — not from the page. Go to Media, click a photo, and fill in Caption: what, where, when. “Stakeholder workshop, Banyuwangi, 2026”. The photos that came from the old site have no captions yet; the strip simply shows none until you add them.

While you are there, check the Alt Text. It was written by looking at each picture and names no event, place or person. You know what the photos really show.

07 Site-wide

Header, footer and site-wide text

Anything that appears on every page is edited once, in the Customizer, and changes everywhere.

Step 1

Appearance → Customize

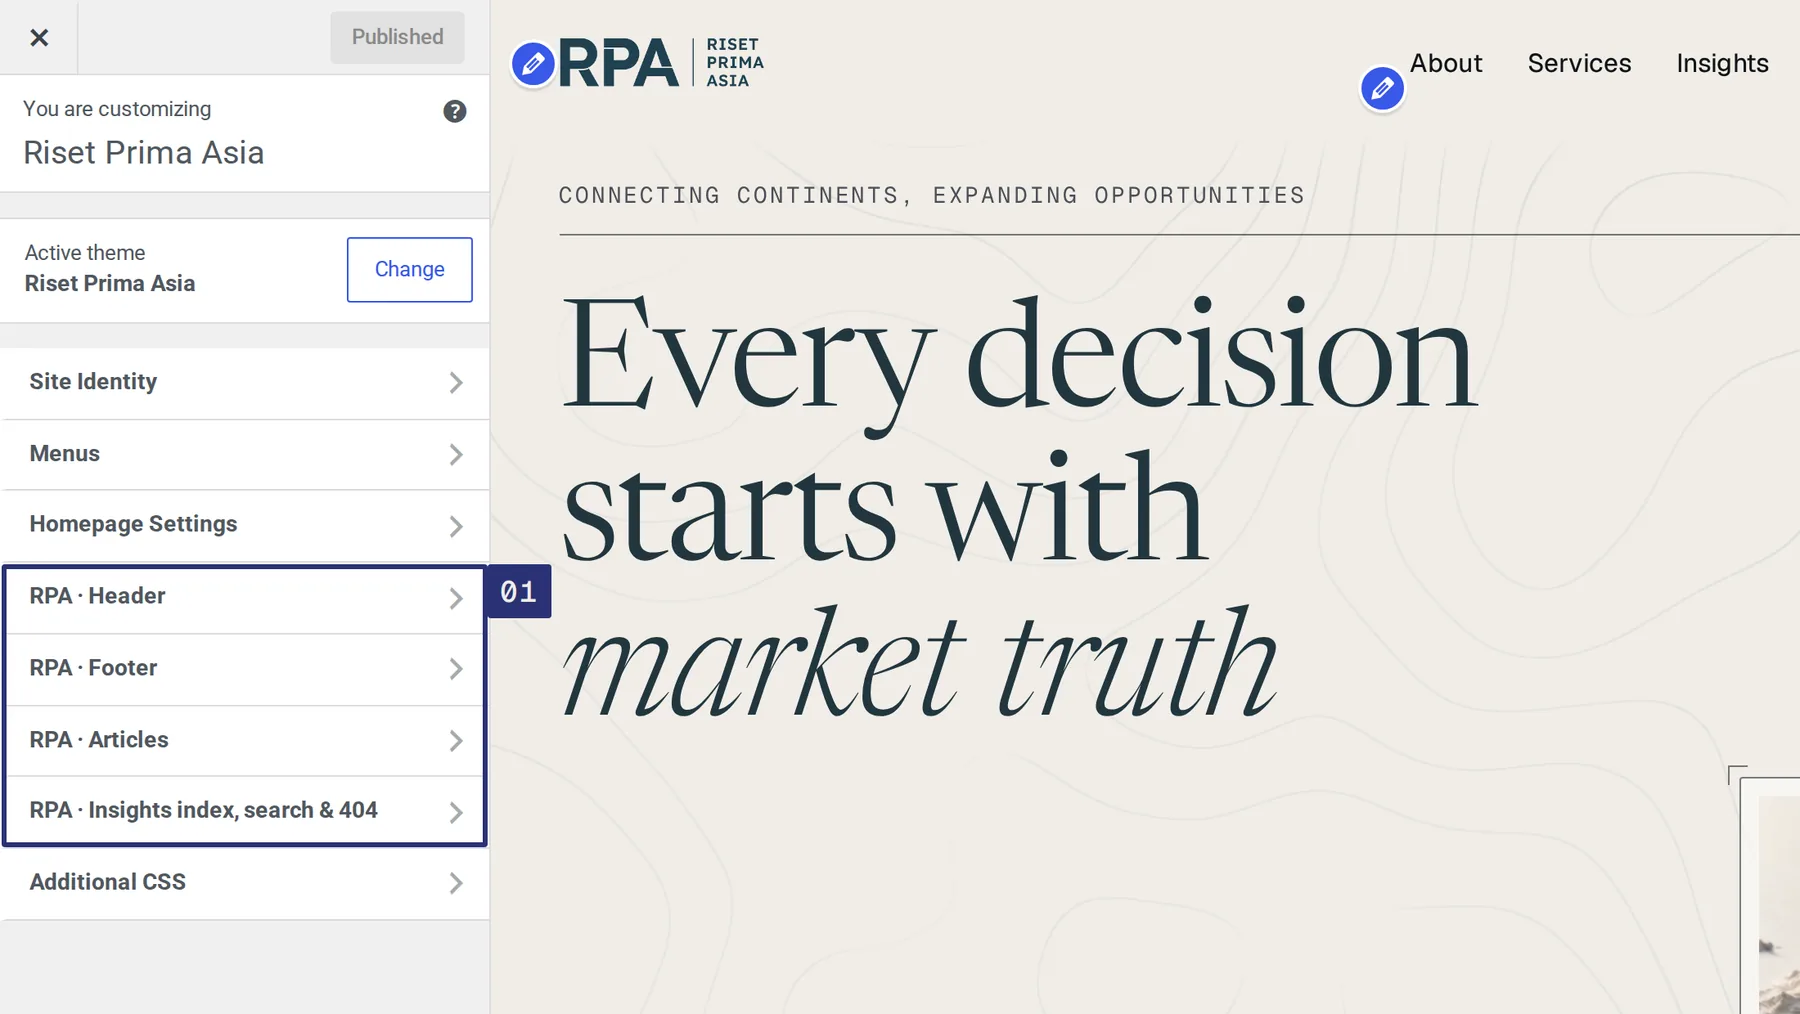
The four sections that begin with RPA · are yours. Click one to open it. The page on the right is a live preview: it updates as you type, and you can click through the site inside it.

The preview opens on Home. Home ends with its own invitation to get in touch, so the footer there leaves out its paragraph and button — if you change those fields while looking at Home, nothing seems to happen. Click About in the preview’s menu first, then scroll down to the footer: every footer field shows on that page.

Nothing is saved until you press Publish at the top of the panel. To leave without saving, press the × and confirm.

The WordPress Customizer. The four sections RPA · Header, RPA · Footer, RPA · Articles and RPA · Insights index, search & 404 are marked 01.
Appearance → Customize.
What each section controls
To change… Go to Good to know
The button in the header RPA · Header → Button label, Button link Leave the label empty to hide the button. A link can be a path on this site, such as /contact/. The button is left out on the page it points to (Contact).
The large line at the top of the footer RPA · Footer → Sign-off line Asterisks make italics here too.
Footer paragraph and button RPA · Footer → Intro paragraph, Button label, Button link Pages that already end with an invitation (Home, Contact, every article) leave out the footer paragraph and button. To see them while you edit, click About in the preview first. The fields say so themselves, in grey, in the Customizer.
Phone numbers and email RPA · Footer → Phone 1, Phone 2, Email These are the footer’s. The Contact page and the closing band on Home have their own copies — change a number in all three places. Not shown on the Contact page, which lists these details itself: check them on About.
The “Where we work” paragraph and opening hours RPA · Footer → Address column heading, Address text, Opening hours One line per row in the hours. When you publish a street address, put it in Address text and change the heading back to “Address”.
Instagram and LinkedIn RPA · Footer → Instagram link, LinkedIn link Leave empty to hide.
Copyright line and small location line RPA · Footer → Copyright line, Small location line Write {year} and the current year is filled in for you.
The link to this guide RPA · Footer → Site guide link label Leave empty to hide the link. The guide stays reachable at /guide/.
The band at the end of every article RPA · Articles → Closing call-to-action · eyebrow, heading, text, button label, button link
“All insights”, “Share”, “Continue reading” RPA · Articles The small labels around an article.
The “In this article” list beside an article RPA · Articles → “In this article” label The list makes itself from the article’s Heading 2 sections, on wide screens, when there are three or more. Leave the label empty to hide the list everywhere.
Topic pages and search results RPA · Insights index, search & 404 → Index · …, Search … The Insights page itself is an Elementor page: edit its heading there.
What a visitor reads when a search finds nothing RPA · Insights index, search & 404 → Message when a search finds nothing Write {query} where the visitor’s own words should appear. To see it, search the preview for a word no article contains.
The “page not found” page RPA · Insights index, search & 404 → 404 · …
Logo and browser-tab icon Site Identity Use a logo file with no empty margin around it.

Step 2

Change, check, publish

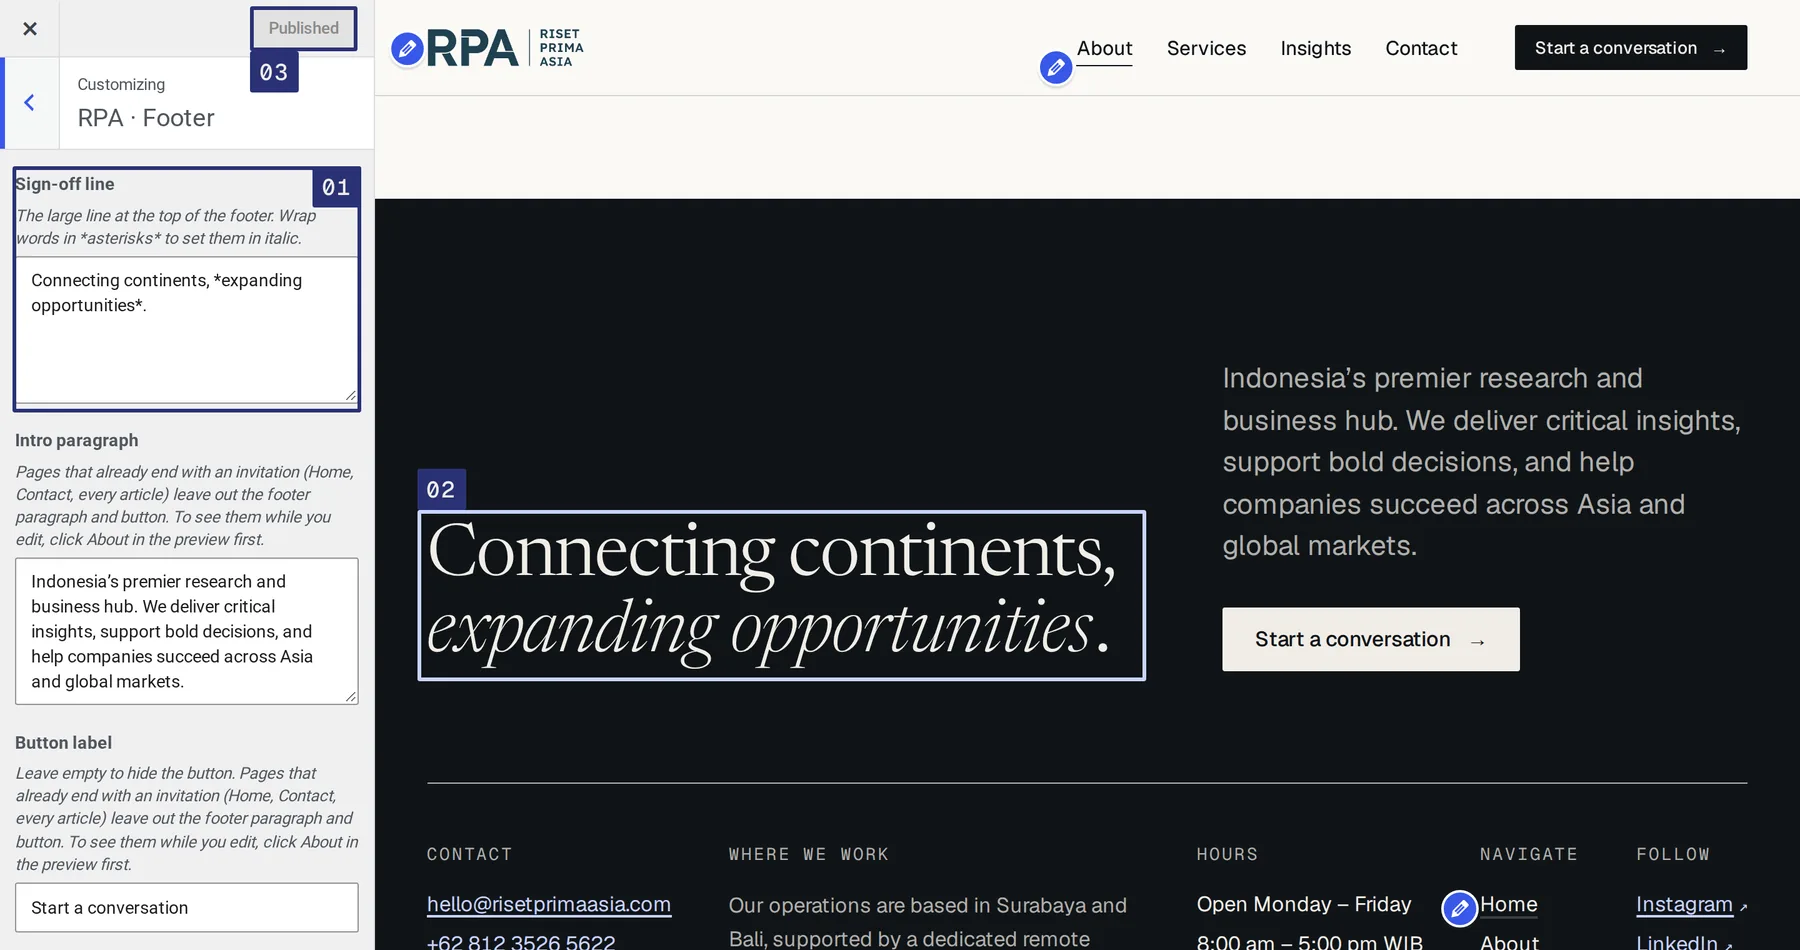
  1. Type in a field — here, the footer’s Sign-off line.
  2. Watch the preview. Scroll it to the part you are changing — and if the part is not there, you are probably on Home: click through to About, where the whole footer shows.
  3. Press Publish. The button reads “Published” when there is nothing left to save.
The RPA · Footer section of the Customizer. Marked: 01 the “Sign-off line” field, 02 the same line in the live preview of the footer, 03 the Publish button.
RPA · Footer, with the About page’s footer in the preview.

Step 3

Menus: the links in the header and footer

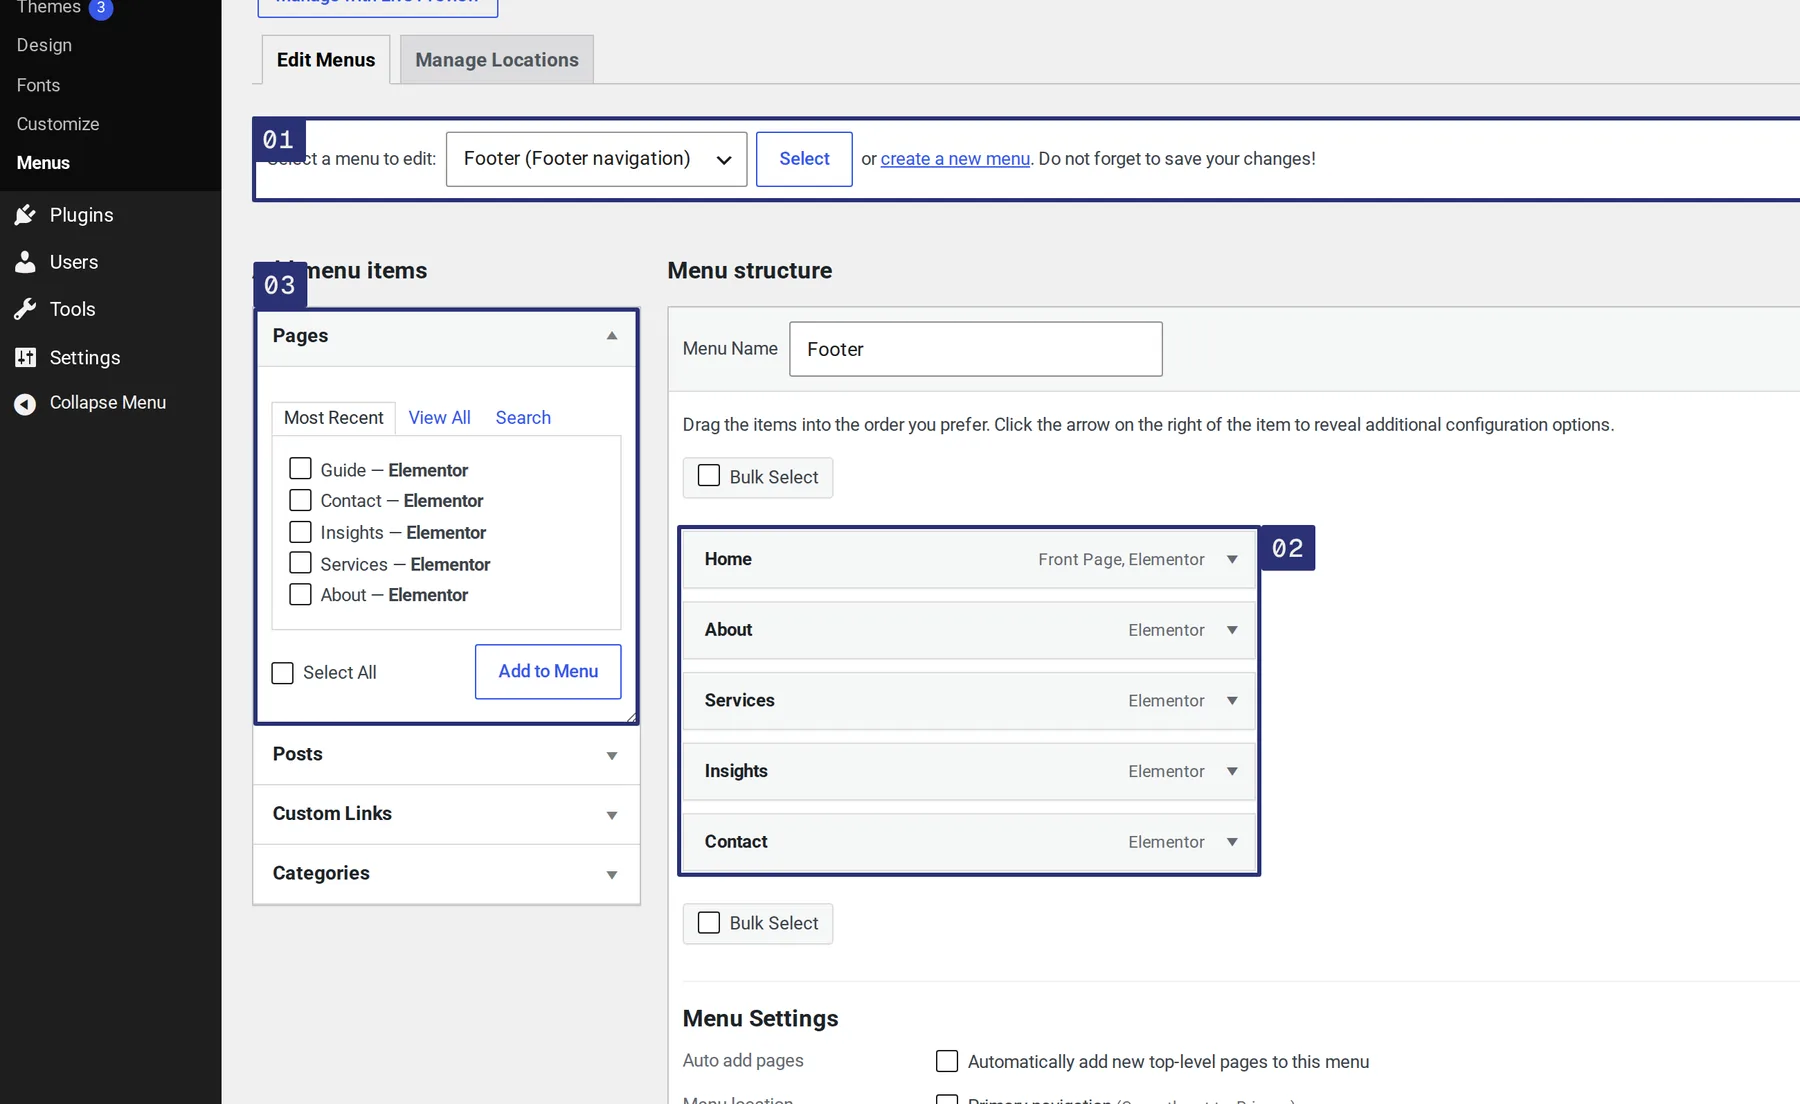
Go to Appearance → Menus.

  1. Choose Primary (the header) or Footer, and press Select.
  2. Drag links into a new order. Open a link with its small arrow to rename or remove it.
  3. To add a page, tick it under Pages and press Add to Menu.
  4. Press Save Menu.

The header has room for four or five short links, on one level — it does not show drop-down sub-menus. This guide is in neither menu, on purpose: it is for your team, not for visitors. While you are logged in, a small Site guide link appears in the bottom row of the footer; otherwise type /guide/ after the site’s address.

The Menus screen. Marked: 01 the menu chooser, 02 the list of links in the menu, 03 the Pages box for adding a page, 04 the Save Menu button.
Appearance → Menus, with the Footer menu selected.
08 Enquiries

The contact form

The form on the Contact page sends each message to you as an email. Nothing is stored on the website.

Step 1

Where messages go

Open the Contact page with Elementor, click the contact block and open Form.

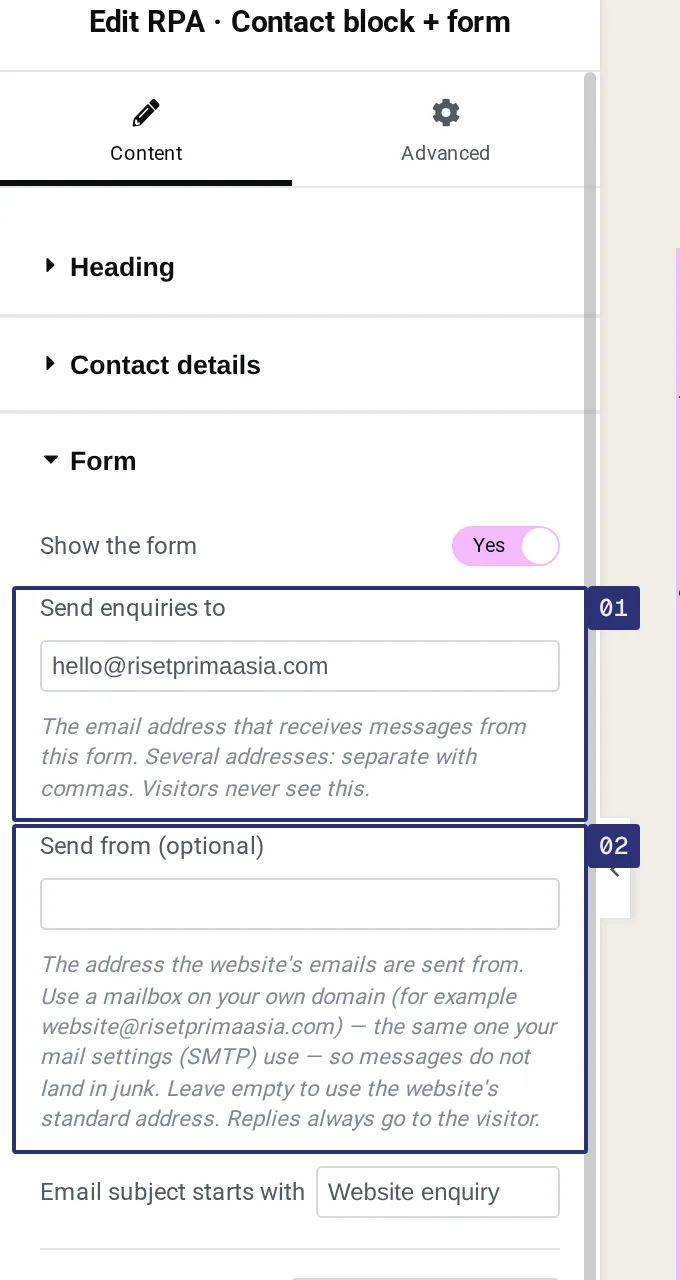
  1. Send enquiries to is the address that receives the messages. For several people, separate the addresses with commas. Visitors never see it.
  2. Send from (optional) is the address the website’s emails are sent from. It should be a mailbox on RPA’s own domain — the one the hosting’s mail settings use — so that messages do not land in junk. Whoever looks after the hosting sets it once; leave it alone unless that mailbox changes. Replies still go to the visitor.

Every other word of the form is in the same panel: the field labels, the button, the small print under it and, under Form messages, what the visitor reads after sending or when something is missing.

The Form section of the Contact block. The “Send enquiries to” field, marked 01, holds hello@risetprimaasia.com.
Contact block → Form: who receives the messages, and the address they are sent from.

Step 2

What the visitor sees

Name, email and message are required; company is optional. After pressing the button the visitor sees a short thank-you in place of the form. If a field is missing or the email address looks wrong, the form says exactly which one, and keeps what they had typed.

The email you receive has the visitor’s address as its reply-to, so you can simply press Reply. The form quietly turns away automated spam: it ignores anything sent within three seconds of the page opening, and more than five messages in ten minutes from one sender.

Step 3

If no email arrives

  • Look in the spam or junk folder of the receiving mailbox first.
  • Check Send enquiries to for a typing mistake.
  • If messages arrive but in junk, ask whoever looks after the hosting to check Send from (optional): it should be the mailbox the site’s mail settings send as.
  • Send a test message yourself. If you see “could not be sent”, the web host is refusing to send mail. That is a hosting setting, not something on the page: ask whoever looks after the hosting to check that the site can send email (it usually means connecting the site to a mailbox with an “SMTP” plug-in).
09 Reference

Every block, and where it is used

In the editor, press + at the top left: the first group in the list, already open, is “Riset Prima Asia” (typing RPA in the search box finds the same blocks). These are the site’s own blocks; every page is built from them. Drag one onto the page to add it — it arrives filled with sensible text to replace.

The Riset Prima Asia blocks
Block Used on What it is for
Hero (page opener) Home · About · Services · Contact The first thing on a page: small label, headline, intro, up to two buttons, and on Home a framed film or photo. Holds the page’s one H1. “Arrangement → Text only” suits inner pages.
Section heading Home · About · Services · Insights Opens a section: index number, small label, serif heading, optional intro and link. Where it is the page’s title, as on Insights, the “Top-right note” field puts a few words at the far end of the top rule (“Research notes”), like the note on the other pages’ openers. Leave it empty to hide it.
Claims (ruled columns) Home Two to four short statements side by side.
Statement (large text band) Home One large sentence on a dark band, with an optional background image or film.
Figures (key numbers) Home · About The big numbers that count up.
Marquee (moving words) Home A slow line of moving words, used for the sectors RPA works in.
Steps (numbered list) Home · About A numbered list: how we work, our approach.
Meridian map Home The world map with lines from Surabaya and Bali to the markets you name.
Plates rail (services) Home The services as large numbered plates that scroll sideways.
Image + text Home · About · Services A picture beside a heading, text, optional checklist and button. The workhorse of About and Services.
Insights index (articles) Home · Services · Insights Lists articles automatically — as rows, as cards, or with one article featured. Can be limited to chosen topics.
Field notes (photo strip) Home · About The sideways strip of fieldwork photographs.
Closing call to action Home The closing band: heading, paragraph, button and contact lines.
Contact block + form Contact Contact details, address, hours, social links and the enquiry form.
Guide step · Guide contents list · Guide look-up table Guide The three blocks this guide is made of.

Moving, copying and removing blocks. Right-click a block on the page for Duplicate, Copy, Paste and Delete. To move a block, drag it by the small handle that appears at its top edge, or open Structure (the stacked-layers icon in the top bar) and drag it in the list. The full-width bands — hero, statement, figures, moving words, plates, field photos, closing call to action — sit in sections with no side padding; when you add another, duplicate an existing section and change its contents rather than starting from an empty one.

10 House style

So the site stays beautiful

The design is quiet on purpose. A few habits keep it that way.

Eleven habits
Do this For example Because
One H1 per page Heading level The hero (or the first section heading) is the page’s title: H1. Every other heading is H2 or H3. Search engines and screen readers rely on it.
Sentence-case headings Why choose us Headings on pages use sentence case: capitalise the first word and proper names only. Not “Why Choose Us”. No full stop at the end. Article titles are the one exception — they keep RPA’s existing Title Case (see Insights → Posts → Add Post).
Captions under pictures Pl. 02 — At the desk “Pl.” (plate) for the paper-model artwork, “Fig.” for photographs. Number them down each page, starting again at 01 on the next page, and say in a few words what the picture shows. Typed like this, the number is set in the site’s small plate style by itself.
Keep headings short under ten words Large serif type needs room. If a heading runs past three lines on a phone, trim it and move the detail into the intro.
Italics for one or two words market truth Italic is the site’s only emphasis. It replaces bold, capitals, colour and exclamation marks.
Paste as plain text Ctrl + Shift + V Word’s hidden fonts and colours override the design.
Links say where they go Read the Bali hospitality report Never “click here” or “read more” on its own. People skim links; screen readers list them out of context.
Leave colours and fonts alone The Advanced tab They are set once for the whole site (Elementor’s Site Settings, and the theme). A colour or font changed on one block will drift out of step with everything else — and coloured text may no longer be readable. Links are indigo and underlined everywhere so nobody has to guess what is clickable.
Describe every picture Alt Text One plain sentence.
Real numbers, real names A research firm’s site is read by people who check. Publish only figures, clients and results you can show.
Look at the phone view phone icon, top bar Before every Publish.

What moves, and why you need not think about it

Headlines rise into place line by line, pictures wipe open, figures count up, the map draws its lines, the services slide sideways. All of it is applied to the blocks automatically — there is nothing to switch on, and new text or pictures you add are animated the same way.

Inside the editor the page stands still, so you can always see and click everything. Visitors who have asked their phone or computer to reduce motion get the same page with simple fades, and the site works fully with no animation at all.

11 Safety net

If something goes wrong

You cannot break the site by editing text and pictures. And almost anything can be put back.

Fix 1

Undo a change you have not published

Ctrl + Z steps back one change at a time. Or simply close the editor without pressing Publish: visitors only ever see what was published.

Fix 2

Go back to an earlier published version

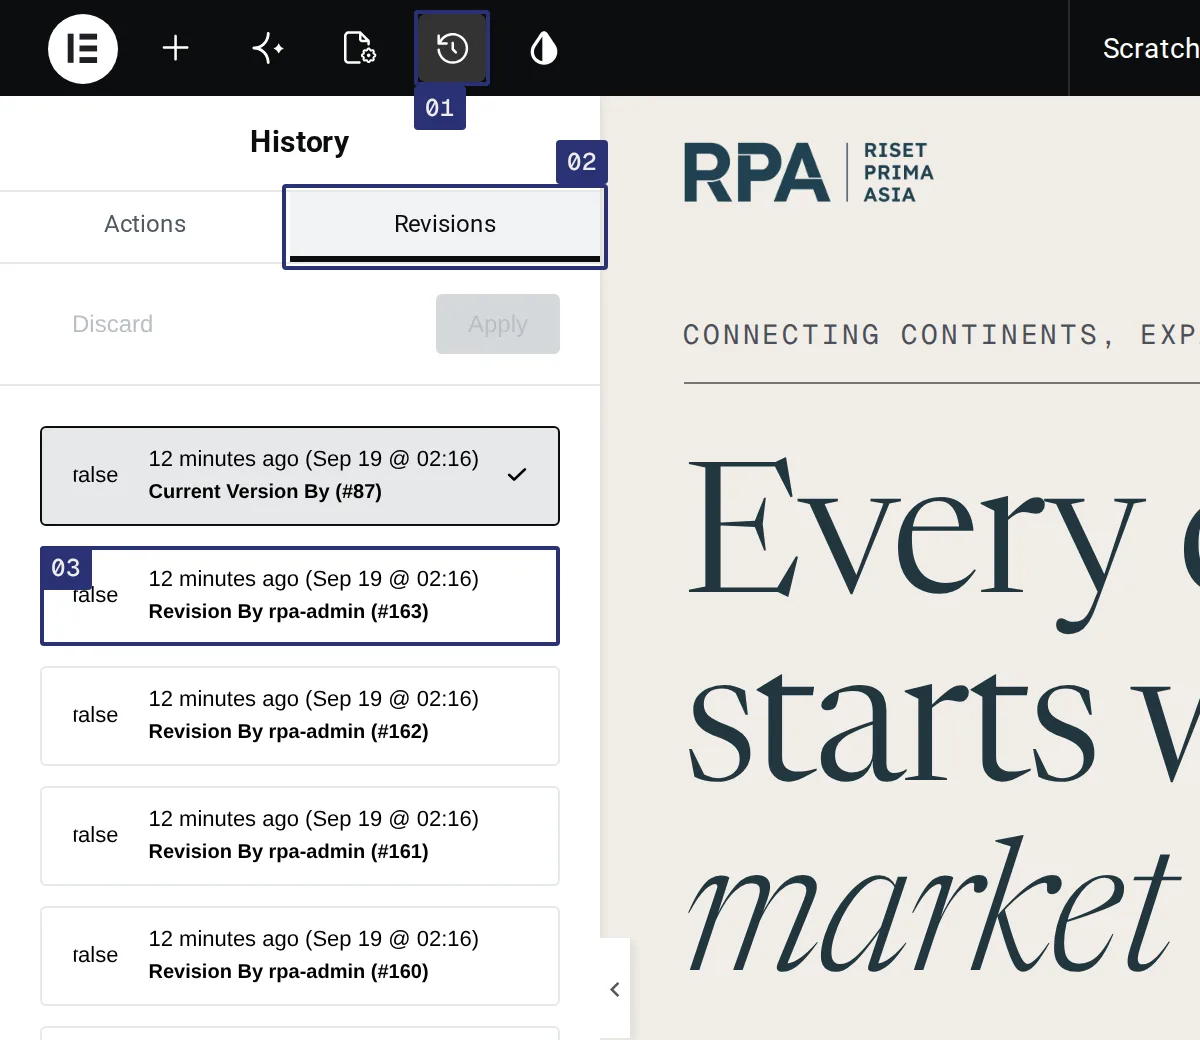
  1. In the editor, press the History icon (a clock with an arrow) in the top bar.
  2. Choose Revisions. Every time anyone pressed Publish, a version was kept, with its date and time.
  3. Click a version to preview it on the page. If it is the one you want, press Apply at the top of the list, then Publish. Discard returns you to where you were.

Articles keep versions too: in the post editor, open the right-hand column and click Revisions.

Elementor’s History panel. Marked: 01 the History icon in the top bar, 02 the Revisions tab, 03 an earlier saved version in the list.
History → Revisions.

Fix 3

The page looks wrong after a change

If a page suddenly looks unstyled, or a change shows in the editor but not on the site, clear the stored files:

  1. While logged in, open any page of the site itself (not the admin screens).
  2. Point at Edit with Elementor in the dark bar across the top. A short list drops down.
  3. Choose Clear Files & Data. It deletes nothing of yours; the files are rebuilt the next time a page is viewed.

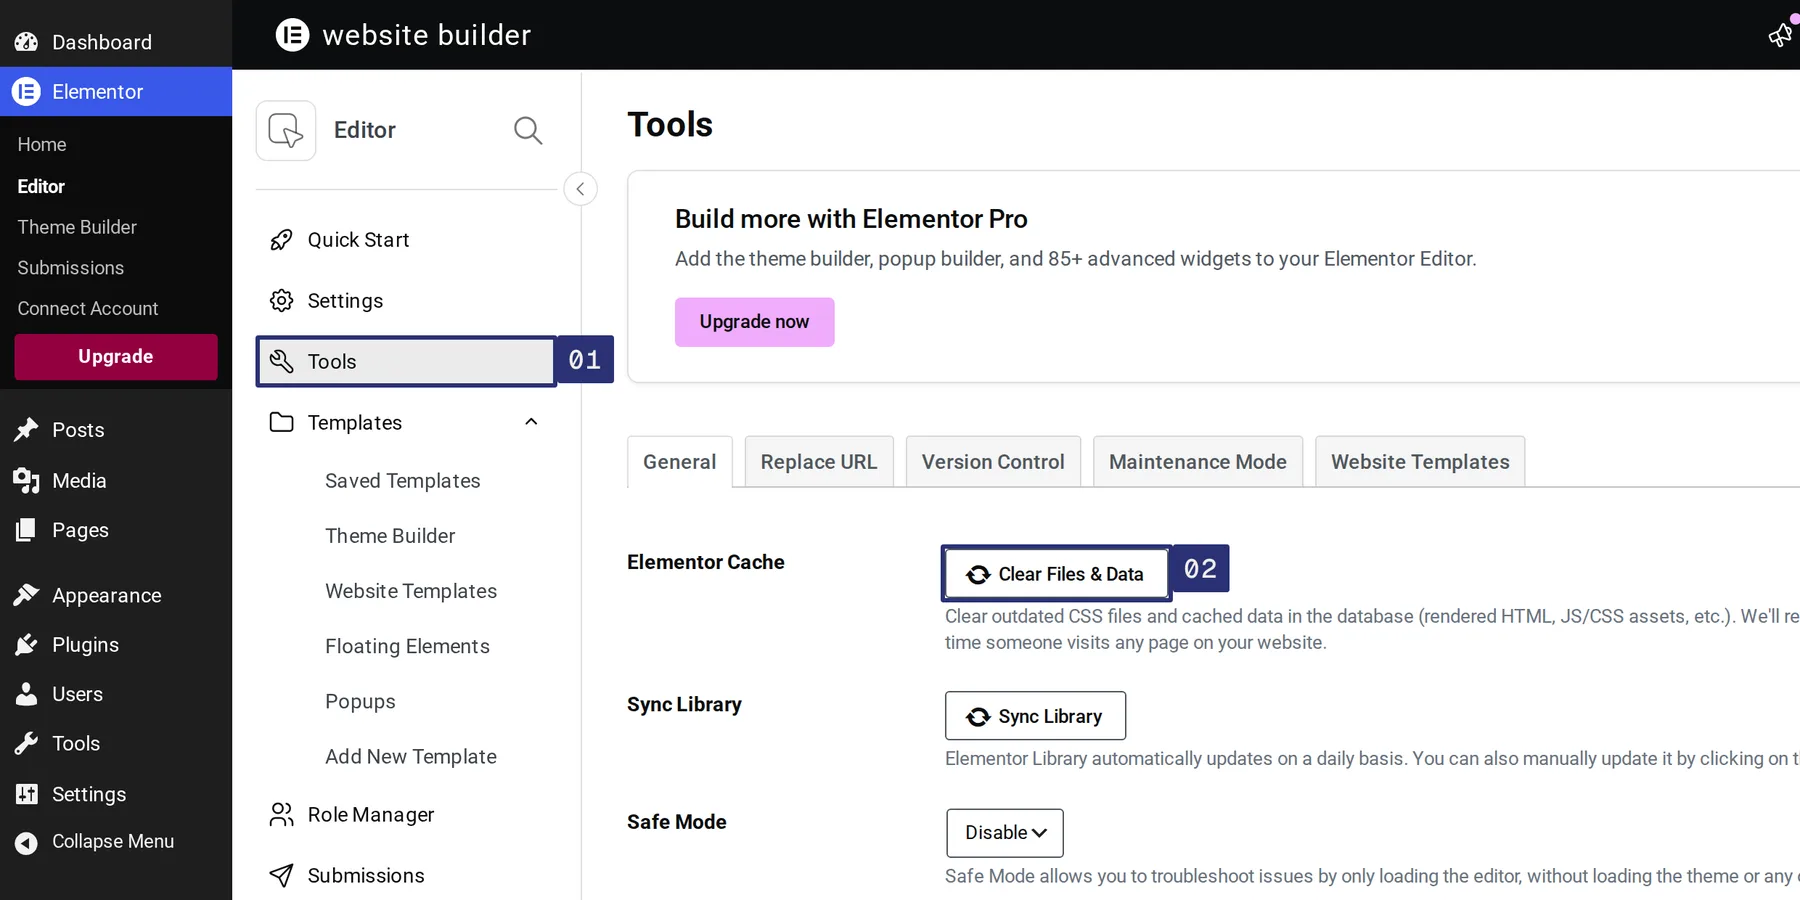
The same button lives in the admin screens, a little hidden: choose Elementor in the black left-hand menu, then Editor directly beneath it. A white list appears beside the menu — press Tools there (marked 01 in the picture below; not WordPress’s own Tools further down the black menu), and in the Elementor Cache row press Clear Files & Data (marked 02). The first time you choose Elementor it may greet you with a “Welcome” window and a video: close it with the × at its top right.

Then reload the page with Ctrl + Shift + R, which makes your browser fetch everything afresh.

The Elementor → Tools screen. Marked: 01 Tools in the left menu, 02 the “Clear Files & Data” button in the Elementor Cache row.
The longer way round: Elementor → Editor → Tools.

And 4

Things to leave alone

The left menu offers more than you need. Editing pages, posts, media, menus and the Customizer is safe. Please do not update, add or remove anything under Plugins or Appearance → Themes, and stay out of Theme File Editor and Elementor’s Site Settings, unless you have agreed it with whoever maintains the site. That is where a site can genuinely be broken.

Two things in the admin screens look urgent and are not. The red Upgrade button under Elementor is an advertisement for its paid edition, which this site does not use. The number beside the circling arrows in the top bar counts available updates; they are the maintainer’s job, applied together and tested, not one at a time.

If you are stuck, write to the person who maintains the site for RPA. Say which page, what you were trying to do and what you saw instead — a screenshot is worth a paragraph.

This guide is a page like any other, built from the same blocks. If a step here is out of date, or your team works differently, open Pages → Guide → Edit with Elementor and rewrite it. It is hidden from search engines and appears in no menu; while you are logged in, a small Site guide link at the very bottom of every page brings you back here.